Tuesday, July 24, 2012

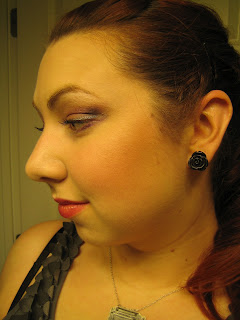
FOTD: Sultry Secretary

Hey Guys! I couldn't find any good pictures in this bunch where I'm actually smiling... Sorry in advance. Maybe that goes with today's Face of the Day theme, the Sultry Secretary! I am feeling silly today, but it seemed to fit; I was wearing my typewriter necklace (which cracked down the middle! Eep!), a white faux-wrap blouse, and a high-waisted black skirt. Unfortunately, I didn't have anyone around to take a picture of me, so no Outfit of the Day in this post.

At any rate, I wanted to do a smokey Film Noir inspired look; retro, but with a bit of a kick. That kick came in the form of some intense shimmer on the inner-crease of the eye and a punchy off-red lip color. Take a look!


My necklace! I'm going to have to try to get some heavy-duty tape on the back to fix the crack...


Here's what I used:

Face: Clinique Redness Solutions Base, MUFE Face & Body Makeup, MAC Pro Long Wear Concealer, Smashbox Luminizing Lotion in Flash, Urban Decay blush in Bang, Tarte loose powder, The Body Shop bronzer, Hard Candy Baked Blush in Pin Up, NYX blush in Taupe, NARS blush in Exhibit A.

Eyes: MUFE Aqua Cream in 13 (champagne; above crease to brow bone and in inner corner) and 15 (taupe brown; on lid), Bare Minerals loose pigment in Unforgettable (in crease), Urban Decay 24/7 pencil liner in Bourbon, Prestige My Biggest Lashes mascara, Prestige brow pencil, Anastasia brow gel in Caramel.

Lips: NARS lipstick in Joyous Red and MAC Cremesheen Lip Glass in Richly Revered.

Cheeks!

Eyes!

Lips! 
I am really pleased with the way this came out! This is my new favorite easy eye makeup; three eye colors, and it has a lot of impact without being too dark or heavy. It kind of reminds me of a silent film star's makeup; it puts the eyes into soft focus and deepens them. 

I love this lip color, too. These are two of my favorite go-to products that are easy for me to wear, but I'd never thought of combining them. When worn together, they make a really nice blood-red tint that I am loving! 

Overall, I'm really happy with this look as an alternative to a traditional darker smokey eye and bold red lip. Can we call it a hazy eye, maybe? No, never mind, that sounds like a medical condition. At any rate, I can see myself going back to this look anytime I need something neutral and polished but don't want to look overdone. 

Monday, July 23, 2012

The Body Shop: All In One Face Base

Hi Dolls!

You may have noticed this product popping up in several of my Face of the Day posts; I've been using it both as a setting powder, and as a powder foundation on days that I want light and easy makeup. I bought it after reading all of the rave reviews for it on The Body Shop's website, and I was able to pick it up during one of their 3/$30 sales. While the retail price is $22, it's possible to get it for $10 or $11 if you wait for one of their BOGO or great 3/$30 sales. That being said, I think it is worth full price; it performs much better than any other powder foundation I've tried, and is less than you'd find a comparable product selling for at your local MAC counter or Sephora.

So, what does this little compact do? What doesn't it do! I bought it hoping it would work for touch-ups throughout the day, providing a bit more coverage than a pressed powder. However, I've had problems with powder foundations in the past because of my very dry skin. Sometimes they end up just looking powdery and unnatural on me; sometimes they end up creating dry patches. And I've never found one that offered more than the most minimal coverage. This is the first powder foundation that I've tried that actually works on me as a foundation. With moisturizer underneath, it doesn't dry out my skin at all, it looks fairly natural, and it provides enough light-medium coverage to help even out my skin tone. It's not moisturizing on its own, and it does absorb any excess oils on my face, but it does not suck the moisture out of my face; I think this would work fine for those with oilier skin than I have, since it doesn't add any moisture in and of itself, however I can't speak to its performance on different skin types. When I use it with the accompanying sponge, it works great as a foundation; with a fluffy powder brush, I can use it as a setting powder over my usual liquid foundation formulas, and it does a great job at that too.

It's worth mentioning that I can use the same color for foundation and a setting powder; sometimes, what I can use as a setting powder is too dark when used as a foundation. It's also very gentle on my sensitive skin. One issue that I can foresee others having is that these shades run incredibly light, and they do not offer enough shades to cover darker skin tones. If you are so pale that you often have trouble finding foundations that match your skin tone, this might be a good range to look into, but if you have darker than medium skin, you'll probably find yourself out of luck with this range. For reference, I am wearing shade 3 (and could probably stand to move into 4 during the summer months when I get a little bit of sun) in this collection, and they only offer 6 shades. In Revlon's Color Stay formula, I am Buff, the second to lightest shade; in most collections, I am the lightest or second to lightest shade offered. Clinique does not offer a shade light enough and neutral-warm enough for my skin tone.


Here it is swatched on my skin; you can get a feel for the finish here. It's definitely matte, but not chalky.


I'm so sorry, Blogger uploaded this sideways and I can't figure out how to change the orientation... Anybody know how to do this on Blogger? 
In the following picture, I am wearing it as a foundation, applied with the accompanying sponge. I am wearing it over moisturizer and a primer. I wore it like this the entire time I was at Disneyland, and it was great for the hot days; it didn't last all day, even with a primer, but I didn't expect it to in those extreme conditions. The great thing was that I could carry the compact with me and touch up without having to be careful to blend it out, or worrying about the texture not matching my earlier foundation. While it didn't hold up to running around and sweating in the heat, it wore off in a very natural looking way and did not look patchy. 

In normal situations, this works just well over a primer all day long. While I carry the compact with me in my purse to touch up where my glasses mess up my makeup on my nose, I usually don't have to touch up other than that; maybe a little around the nose and chin on days that my skin isn't as dry. 

Worn as foundation 
In the next picture, I am wearing the All In One Face Base as a setting powder (applied with a fluffy powder brush) on top of Revlon's Color Stay liquid foundation. You can see that the finish is matte without looking as chalky or unnatural as some truly matte powders can. I would *almost* call this a satin finish, although I think it does land on the matte side of that classification. 

Used as a finishing powder

Summary: I've been using this for a few months now as both a foundation and a finishing powder, and it works great in both respects. It's compatible with my dry, sensitive skin, and the shade range is great for very pale skin tones that aren't often catered to in foundation shades. The price is great, too; it's often on sale for $10-$11, and even at its regular $22 price point, it is still less than many higher end powder foundations while still performing like one. However, anyone with darker than medium skin probably will not be able to find a match in this range; it seems very limited to very-pale to pale-medium complexions. Very strange! However, if you can find this in your shade and you want a versatile compact you can use as a setting powder or powder foundation, this just might do the trick!

Monday, July 16, 2012

Fresh Sugar Lip Treatment in Coral

Today I'm showing you a few swatches and giving you my thoughts on Fresh's Sugar Lip Treatment in Coral. I have owned and repurchased Plum, so it may come as no surprise that I am  a big fan of this formula. I know that $22 is pretty steep for something that amounts to a lip balm, but it is my favorite lip balm; I think I can say, hands down, that it's the best I've used. Does the increase in satisfaction justify the increase in price? I don't know, but I can say that they aren't necessarily directly proportional... For me, the difference is worth it, especially since I use both of my lip treatments (Coral and Plum) as cosmetic AND treatment items, rather than just one or the other. I have no problem dropping $22 on a quality lipstick, so Fresh's Sugar Lip Treatment kind of gets lumped into that category; it's a lip color that also happens to feel divine, smell amazing (like sugared lemon!), and make my lips the softest and plushest they can be.

And that's what really sets this product apart for me; it feels absolutely amazing on, very smooth and cushiony without being uncomfortably slick, greasy, waxy, or sticky, and leaves my lips free of dead skin and looking velvety soft and completely hydrated. The soft-but-noticeable tint makes it a beautiful option for keeping in a purse. And, if I put these on before bed, they'll last all night; this means that during the day, I only really need to touch up after eating or drinking, otherwise they'll go strong for a good few hours. Plus, the case is adorable; it's a brushed metal in the color of the balm. It's got some weight to it, and unscrews. I think that Fresh did a good job of upgrading the packaging to reflect the price hike; you really do feel like this is a quality product when you hold it in your hand, not just a run of the mill $2 lip balm that's got a snazzy new label.

Just how tinted are these babies? Well, Plum is a little more subtle, so I was not expecting the rush of color that's in Coral. It's definitely bright and noticeable, although not opaque. The color itself leans more pink than orange, although I think it is fair to still call this shade coral. It's perfect for summer; it brightens up my face, softens my lip, and offers sun protection (it has an SPF of 15). If you get it in your mouth, it leaves the faintest bitter taste in the back of my mouth, which I believe is from the SPF; I've had this problem with other sunblocking lip balms.


Here it is swatched heavily on the left, and lightly on the right. This is just about as dark and as light as you can get this product.


Summary: I love this product, and will continue to purchase Fresh's Sugar Lip Treatments as they release colors that appeal to me or as I run out of my current go-tos. The main criticism I have heard associated with this product is the price, but that is subjective; it is worth it to me to have a lip color that leaves my lips in great condition, but it's a personal decision. Price aside, I think this is a great product and might even be my "Holy Grail" tinted lip balm. Coral is a great color for summer; it's sheer but bright, and I think it would be flattering on a variety of skin tones as it doesn't lean too orange or too cool.

Have you guys used Fresh's Sugar Lip Treatment? Have you checked out Coral?

Friday, July 13, 2012

NOTD: OPI Royal Rajah Ruby

Hi Dolls!

I finally got Royal Rajah Ruby! Woo-hoo! I've been wanting this OPI polish for awhile, but hadn't seen it in ages... I was able to snag Black Cherry Chutney, released in the same collection, awhile ago, and it became a favorite. After seeing swatches of some of the other colors from the India collection, I decided I needed to get my hands on Royal Rajah Ruby as well. Granted, they are really similar, but Black Cherry Chutney definitely leans more purple/burgundy, while Royal Rajah Ruby is a blackened red shade with lots of shimmer that just makes it glow. They're both gorgeous colors, and I'd be hard pressed to choose between them; if you'd like to see my earlier review of Black Cherry Chutney, you can do so here. Sorry for the bad swatches; I think I may have gotten better at painting my nails in the last year or so! At least, I certainly hope so.

As stated earlier, Royal Rajah Ruby is a glowing blackened deep red, although it does not look black on the nails, even in poor indoor lighting. It's a gorgeously rich color. I found mine on sale for $6.00 (down from $8.50), and word on the street is this shade is being discontinued! If you've been thinking about picking up this color, now is the time to act!

Check out how gorgeous this vampy, dramatic color is! It's the sort of shade that looks great on short or long nails, and is really flattering to my skintone; it doesn't make my fingers look dirty or red. I can see this going into regular rotation come fall and winter. I love shades like this, they instantly make me feel more put together, elegant, and mysterious... Should a nail polish have this much of an impact on my perception of myself? Probably not, but I don't care!

Natural light
 I wanted to show you guys this bottle shop so you can get an idea of all the gorgeous golden shimmer that goes into this shade; I think this is what really sets it apart from other blackened reds with shimmer. Click to enlarge, and you'll see how fiery this can look in the right light!

Royal Rajah Ruby

And I got a slightly-burry shot so you can see how that shimmer really does translate to the nail. This is in natural light during a cloudy sunset, so imagine what this looks like in really bright sunlight!

*drools* 
Summary: This polish is such a beautiful color, the formula was a dream to work with, and it lasts on my nails for about 3-4 days without chips, which is on the better side of average. I know some people have even better luck with OPI wear-wise; maybe it's the poor condition of my nails, maybe it's body chemistry, but it lasts about an average amount of time on me. This just means it's not my go-to nail polish, but the colors they put out seem to be really classic and beautiful... Seriously, if you are drawn to this at all, pick it up before it is discontinued!

Do any of you have this color? What do you think of it, too "boring"? I love deep reds, plums, and burgundies... They are my favorite, even if they're not especially daring or edgy!

Thursday, July 12, 2012

LOTD: French and Fabulous, plus a remix!


Hi everybody! I decided to take a break from my pin-up looks and give an old palette some new attention. I recently re-discovered my Too Faced "French & Fabulous" palette, which looks like it debuted as a limited edition palette for Holiday 2009. I honestly can't remember much about it; I believe my mom gave it to me as  a Christmas gift. I don't think I gave it the love it deserved at the time, and when I unpacked all of my makeup after my most recent move, I stumbled upon it. It's actually a really nice little set, with six eyeshadows that range from neutral to bright, and two bronzers. It seems to have a bronzed pink color scheme, and a lot more bright pink than I usually wear! However, I was in a girly mood, and wanted to do a bolder look than I have been lately. The powders and eyeshadows are very pigmented and very finely milled, although a couple of the eyeshadows have relatively gritty glitter in them. Not a problem, in and of itself, but I know that's not some people's cup of tea, and I thought it was worth mentioning. I actually own a compact of Pink Leopard Bronzer all on its lonesome, but I can't find it, which is originally why I pulled out this palette; I was excited to at least be able to use the mini in here!

I should mention before we move forward that after I took all of these pictures and had been wearing the look for awhile, I decided to tweak it a bit, which is why I've got a remix in here to show you all as well! This is what I ended up with on my first try:


And here's what I used:


Face: Clinique Redness Solutions Face Base, MAC Pro-Longwear concealer, MUFE Face & Body makeup, Smashbox luminizing lotion in Flash, The Body Shop Bronzer in 01, Guerlain Meteorites Perles D'azur, NYX blush in taupe, Too Faced Pink Leopard Bronzer, Too Faced Snow Bunny Bronzer, Too Faced eyeshadow in Mess in a Dress.

Eyes: NARS Smudgeproof Eyeshadow Base, Too Faced eyeshadows in Totally Toasted Brown, Totally Toasted Beige, Poodle Puff Raisin, Poodle Puff Pink, Mess in a Dress, and Ooh and Aah Black, Urban Decay 24/7 pencil liner in Ransom and Midnight Cowboy, Urban Decay 24/7 Liquid liner in Revolver, Prestige My Biggest Lashes mascara, Prestige brow pencil, Anastasia brow gel in Caramel.

Lips: Cover Girl NaturLuxe gloss balm in Peony topped with BareMinerals gloss in Wild Honey.

Here are some more pictures of the palette, in case you're curious:


And here are some more shots of the look:


But wait! I told you I promised you a remix. I wasn't happy with the lip color, it felt too warm for the pinks that were on my eyes, so I changed it to Revlon's Lip Butter in Berry Smoothie. I also went back and added a bit more definition to the cat-eye shape that I did with the black eyeshadow, and pulled out the purple eyeliner (Ransom) on the bottom lash line. 


Looking at them now, I don't think the first lip color "didn't match" like I originally thought, but the different pinks do give a very different "feel" to the overall look.

Which version do you prefer? Do you guys ever go back and revise a look after wearing it for a couple of hours? Does anyone else have the French and Fabulous palette? I'm glad I rediscovered it, I like it even more now than I did when I first got it! 

Wednesday, July 11, 2012

Monkey Bread! Aka DELICIOUS

Hi Guys! It's been awhile since I've posted a recipe. I know that's not the main purpose of this blog, but I enjoy taking  a break from makeup every once in awhile and sharing my culinary exploits with you all.

I just made Monkey Bread for the first time last night. I know, I can't believe I'd never made it before then, because it was SO easy and it's made of delicious. My boyfriend told me before I made it that he wasn't sure if he would like it. "Excuse me? Do you KNOW what goes into this?" It's 2 sticks of butter, a bunch of sugar, and the equivalent of 40 biscuits. With an ingredients list like that, you know it's going to be good.

And then he started asking why it's called Monkey Bread. "Because it looks like a monkey made it?" Sure. Good enough for me. Let's go with that.

So, if any of you have not had Monkey Bread, it tastes like a delicious ring of deconstructed cinnamon roll. And, while you can make your own dough, that takes things like time, effort, and kneading, so I decided to take the easy route and use Pillsbury biscuits. They actually sold a package of 4 containers shrink-wrapped together with a recipe for Monkey Bread on the label. I did not use their recipe (I started from this recipe), but I did buy that package. They're the little 7-oz cans of buttermilk biscuits; NOT the flaky kind or the giganto-Grands kind. Just the nice little package with 10 biscuits each.

Before I go any further, I'll show you guys a picture. This is your reward for reading this far. If you continue reading and make the recipe, you actually get to EAT this. That's a pretty good reward.


Ingredients:

4 cans of non-flaky, buttermilk biscuits. Plain ol' Pillsbury Buttermilk Biscuits will do.
2 Tablespoons of cinnamon (less if you're not big into cinnamon)
2 sticks (1 cup) of unsalted butter
1/2 cup of brown sugar
1 cup of regular sugar

*Special Equipment* A circle cake or bundt pan

Preheat your oven to 350 degrees.

Start by unwrapping your cans of biscuits and cutting each biscuit into 4. This doesn't have to be precise; you can stack 2 or 3 biscuits at a time and then quarter them. Go ahead and just place these into a pile.

Put your 1 cup of regular sugar and your cinnamon into a big ziplock bag or a paper bag. I used a paper bag, which was kind of messy, but I wanted the extra room for the little biscuit parts to jiggle around. Get the sugar and cinnamon mixed up together, and then put your pile of biscuit quarters into the paper bag. Give it a good shake (preferably over the sink), and check to see if any of the biscuit pieces are sticking together. If they are, you'll want to pick them apart and make sure all of the sides get coated in your cinnamon sugar. Once they're all coated, put them in the pan you are using, and pour the excess cinnamon sugar on top.

Now, you're ready for your ooey-gooey topping. This is the lifeblood that courses through your Monkey Bread. Either over the stove or in the micrwave (working at 30-second intervals, stirring in between) melt your butter with your brown sugar until you have some unholy concoction of incredibly hot deliciousness. Pour it over the biscuit pieces in the pan. It will seem like an awful lot of liquid, and you might not even have monkey bread showing in places. That's ok. Just make sure the level is pretty even, and drag pieces of bread over from one part of the pan to an emptier part if you need to.

Carefully place your pan of delicious into the oven and bake for about 30 minutes (maybe a little longer), or until the top has darkened and looks golden and crispy.  Once you pull it out, let it sit for 15-30 minutes, and then carefully flip the pan over on top of a plate. If you give the pan a good shake or two, the Monkey Bread should pop right out.

Dig in! It will be delightfully ooey-gooey in places, and amazingly sugar-crisped and caramelized in other areas. The inside will be cinnamon-y and sweet and oh-so-soft.

I have a few more gratuitous images of what this will look like once it's done.

Here's a gooey part. It's so delicious, my camera couldn't focus on what it was doing.

Ooey gooey!

And here you can see the transition into the slightly crispy caramelized portion:

Delightfully crisp with melt-in-your-mouth sugar!

I kid you not, this stuff is amazing. It takes almost no effort, and it does not taste like it's from a can. Sure, you could make the dough yourself if you enjoy that sort of thing, but it's really not necessary once you dump a bunch of sugar, cinnamon, and butter on it. I feel compelled to mention that this was a big hit with both my boyfriend and his parents; his mom and dad were fighting over the portion I sent over, so I brought them more, and his mom told me she might not tell his dad there was more in the house... Can't say I blame her! It's tasty enough to keep for yourself, but easy enough to make extra to share :)

Enjoy!

Monday, July 9, 2012

Benefit Coralista

It's been a long time since I've done a good, old-fashioned product review! Well, I am trying to remedy that; I have a couple in the works, and we're going to kick it off today with an exploration of Benefit's Coralista.

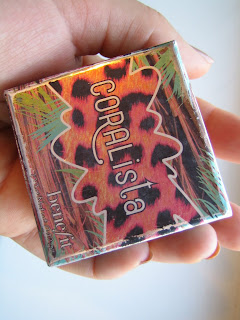
Coralista is one of Benefit's Box o' Powders, their collection of brightening, bronzing, and blushing face powders. I'd call Coralista a blush; if you have a darker skin tone, though, you could probably use it to highlight and brighten. It's the perfect coral shade, a beautiful balance between pink and coral that makes it suited to both warm and cool complexions, and I love that it goes with almost any combination of colors you can think of. When I need a quick wash of brightening blush and don't want to think too hard about matching the blush color to the eyeshadows I've chosen, I reach for Coralista. It's also a sheer enough but buildable color that it's pretty foolproof; you are not going to look like a clown (unless you want to; like I said, it is buildable).  It will run you $28 for .28 ounces of product, and the box includes a specialized brush. If you'd like to read more about it, you can do so at Benefit's website.  I don't use the brush that is included with it; it's a fine brush, just not the right size for precise placement. I use Coralista with a pretty basic fluffy blush brush (mine is Sonia Kashuk).

My poor Coralista is a couple of years old; the box is looking a little bit beat up, and they've changed the box design so now the lid flips up, instead of lifting off. I suppose this is an improvement, but I don't really mind mine! I mentioned before that this is a nicely balanced coral-pink shade that isn't overly cool or overly warm. It isn't sparkly, but it does have a faint hint of very fine pink-gold shimmer to it, just enough to give it a bit of an iridescent glow and keep it from looking flat. While the base color leans more coral, this glow pulls a bit pinker, and I find this finish really flattering (and forgiving when it comes to application)!

Here's the box:

Coralista!
 The included brush:

And the product itself! You can get an idea of its "glowiness" here; notice that there is no glitter or noticeable shimmer.


And swatches! I've shown what it looks like sheer on top, and built up on the bottom. I love that finish! Kind of a glowy satin.


And here I am wearing only Coralista over foundation and powder; no bronzer or highlighter. I've done a couple of passes of Coralista with a fluffy blush brush to build up the color some.


Summary: Coralista is a gorgeous pinky-coral shade, and its finish and opacity are SO forgiving. It's a really easy to wear, flattering blush. I'd recommend this to anyone, from blush novices who are afraid of overdoing it, to those who have a full arsenal of blushes and are looking for something soft and pretty but buildable.

Do any of you own Coralista? I love Benefit's Box o' Powder line, and Coralista has become my go-to brightening blush. I can wear it on its own and get a bit of a highlight along with a healthy glow.

Friday, July 6, 2012

NOTD: Playing with Galaxy Girl

This is a nail polish combination I wore about a week ago, and I can't get it out of my head... I might just do it again, or at least a close variation on it!

Can you believe that Galaxy Girl is the only Orly polish that I have? This is unforgivable, and it's definitely something I need to work on rectifying... They come out with some really amazingly beautiful and unique colors, and I don't even have a good excuse as to why I don't own more of their polishes. At any rate, when I first got it, I wasn't crazy about the way the color looks on me; sort of like a bruise. However, it's been growing on me, and I recently played around with layering it... boy, does it glow with a base color underneath! For this manicure, I used three polishes. My base was OPI Number One Nemesis, a very sparkly gunmetal. I put Galaxy Girl on top of that, which is sheer enough that the sparkles of Number One Nemesis show through, but dark enough that Galaxy Girl's color dominates. Finally, I added a layer of Icing's Pampered and Primped, an incredibly sheer orchid with angular pieces of mylar suspended in it that flash blue and peach.

OPI Number One Nemesis, Orly Galaxy Girl, Icing Pampered and Primped 

Ugh, I know, I know, I need to get back into the habit of cleaning up my manicures... This is embarrassing, but I dropped my clean-up brush into my bottle of acetone! And it started melting! I need to remember where I put my backup brush...

Indoor light
 If you enlarge this next photo, you can see the effect of Number One Nemesis peeking out from underneath Galaxy Girl. I really like the bigger pieces of shimmer of Number One Nemesis layered beneath the fine shimmer of Galaxy Girl, it's really lovely!
Natural light
I love layering glitters and shimmers... So much fun! I am still really bad at jelly sandwiches (I experimented a bit last night, might have made one work!), but layering is so easy and so satisfying. Now, if only I could find my clean-up brush so it doesn't look like a five year old painted my nails...

What layers do you guys like on your nails? Do you have more manual dexterity than a child? I sure don't. Any clean-up tips? (Other than pouring your acetone into a small dish so you don't lose your brush in your industrial-sized acetone bottle... Figured that one out on my own. Gotta break a few eggs, right?)

Thursday, July 5, 2012

FOTD: Summer Reds

I was wearing a kind of vintage-ish outfit the other day, and wondered if I could do a 1940's inspired face without looking too "done up", and this is what I came up with! I think you can definitely see the vintage inspiration if you're told that's where I was coming from, but it doesn't look like stage makeup.  I didn't use as many products for eyes and lips as I tend to, but I used way more on the cheeks than usual to try to get the exact cheek color I had in mind... There was a lot of layer, buffing, re-layering, re-buffing... I also tried to focus the brightness (hello, Bang!) on the apples of the cheeks, and placed more muted, brown-based (like Dallas) shades further back towards the hairline.


Here are some (but not all) of the products I used:


Complete list of products used:

Face: Almay primer, Hard Candy Glamoflage concealer, Make Up For Ever Face & Body Makeup, Urban Decay cream blush in Bang, L'Oreal Infallible powder, The Body Shop Bronzer in 01, Hard Candy Baked Blush in Pin Up, Benefit Dallas, NARS blush in Exhibit A, Philosophy The Color of Grace Amazing Grace Shimmering Face Powder.

Eyes: Make Up For Ever Aqua Cream in 13 as base, Ulta eyeshadow in mink, Benefit Gilded on inner corner and blended into crease, Urban Decay 24/7 eyeliner in Zero (on top lash line) and in Baked (on lower lash line), Prestige My Biggest Lashes mascara, Prestige eyebrow pencil, Anastasia Brow Gel in Caramel.

Lips: NARS lipstick in Joyous Red patted on gently.

Cheeks!
 Eye close-ups:


And Joyous Red worn very lightly, an old favorite!


Wow, I can't believe I don't wear Joyous Red patted on lightly like this more often! It's the perfect "my lips but redder" shade; it doesn't look too unnatural. I don't know about you guys, but if I want a subtle lip color, any form of red is usually off the table; even sheer red is often still very bright. If you're curious what this looks like worn more heavily, check out my earlier review of it here.

Do you guys feel like summer calls for less makeup? I try to do more natural looks when the weather is hot and I know I'll be outdoors. Less maintenance!