Monday, April 30, 2012

NOTD: Ulta's Set The Nude (+ Glass Slipper!)

Ulta Brand Salon Formula Nail Lacquers are on sale, 2/$4 this week at Ulta! That's a bargain, even considering that these bottles only hold .33 ounces, as opposed to the standard .5. These polishes are normally $6 each... so you know I picked up a few. Four, to be exact... I'd had my eye on a few shades, but was waiting for a good sale to come along. Set the Nude was actually not a color I planned on buying, but I had 3 non-negotiable colors and had to find a fourth to round out my purchase and to take advantage of the sale with. Set the Nude spoke to me; in the store's poor fluorescent lighting, I swore it was a beige putty color with a hint of shimmer. Imagine my surprise when I pulled it out the next day in natural light and realized it was a pale warm lavender-grey cream! I have to say, I was a little bit disappointed, but I quickly realized that I have a thing for muted purples, and this was a version of that color that I did not already own. Plus, my walls are a paler version of this color... I couldn't have painted my whole home a light warm lavender-leaning-grey if it was a color I didn't like! So here we go...

Indoor light:

Ulta's Set the Nude 

Natural light:

Set the Nude nail polish

But as soon as I got it on my nails, I was feeling a little bored with it. It's a nice color, but not exactly what I was in the mood for. I'd really had my heart set on a bit of sparkle! So I cracked open Sally Hansen Diamond Strength Nail Color in Glass Slipper, and added two coats of that for some silver flake fun. I really like the result!

Indoor light:

Set the Nude + Glass Slipper

Outdoor light:

Set the Nude + Glass Slipper
And just for fun, here's a comparison shot of my nails up against my walls! It's definitely in the same family, although my walls are lighter and read more "grey" than purple.


Summary: I found the formula of Set the Nude to be on the thick side (as many pastels tend to be), but it wasn't impossible to work with. I used two coats to get an opaque, streak-free finish. Glass Slipper was great as a top coat, but I feel like it kind of ate up top coat... In a weird way! It wasn't just that there was a texture, it was like the flakes were getting caught in the top coat and creating drag and wrinkling on the edges of the nails. Very strange. I used Seche Vite, I wonder if it's just not the right top coat for Glass Slipper, or if I need to wait for Glass Slipper to dry more before I add the top coat. (I generally add Seche Vite while polish is still a bit tacky; it seems to adhere better and reduces the risk of shrinkage.) Anyway, I've never had that happen before, even with rougher glitters and more textured flakey top-coats, so I'll have to experiment some more.

What do you guys think? Are you going to pick up any of the Ulta nail polishes while they're on sale? I am loving Glass Slipper so much more than I thought I would... It's more subtle than the iridescent flakey top coats we've been seeing everywhere, and the smaller flakes kind of give a robin's egg speckled effect. Very cool!

Oh, and please excuse my cruddy nails... I have been having a couple of bad nail weeks here... My cuticles have been complaining, they've been sooo dry, and I cannot keep my hands moisturized for the life of me! That's being reflected in my nails as well; they've been peeling like crazy, and they got stained red despite the fact that I use base coat religiously. I think it happened in the removal process... At any rate, I'm not feeling great about my nails right now!

Sunday, April 29, 2012

L'Oreal Colour Riche Lipstick in Sparkling Coral

I promised you guys a closer look of Sparkling Coral when I posted this face of the day featuring it, and here it is! I found Sparkling Coral on a recent trip to Bed Bath & Beyond's amazing drugstore makeup department. I've said it before and I'll say it again, I feel like this is the best place to shop for drugstore makeup brands. If you have a Bed Bath & Beyond with a beauty department, take advantage of it! It's worth checking to see if one of your nearby stores has one. They don't run sales on their cosmetics, but they're less expensive than my local Target and Walmart, and you can use Bed Bath & Beyond 20% off and $5 off $30 coupons on the cosmetic and beauty merchandise as well. Plus, they have a great selection; lotions, shampoos, and conditioners that are difficult to find are often easily found on their shelves. And did I mention they are consistently the first store in the area to put out Special Edition displays, which are always magically well-stocked? Simply put, it's an amazing resource.

Anyway, they had all of the Spring and Summer LE displays out, and I snatched up L'Oreal's Sparkling Coral, despite having had a less than stellar track record with the Colour Riche formula in the past. I think my past few Colour Riche formulas had been just fine, but without anything specific to recommend them, and the waxy-floral cosmetic smell they gave off was a little off-putting. That being said, Sparkling Coral is a different beast. The formula is sheer and can be built up to medium-opacity. In this case, the slightly waxy formula is a great thing; it makes my lips look very full and air-brushed, with the layers of shimmer in the lipstick building to a kind of "jelly sandwich" texture. The color itself is really wearable, too; it's a sheer tangerine with coppery gold shimmer, but not so much shimmer that it is frosty. It's super flattering, and because it can be worn sheer, I think it would be flattering on lots of skin tones. Yes, it does have the signature Colour Riche scent, but it fades very quickly. You know what's funny is that it actually reminds me of my mom; she used a lot of Colour Riche lipsticks, and I remember sitting in the car with her while she touched up her makeup and having this specific scent flood the vehicle as soon as she pulled off the cap.

Sorry, I am waxing sentimental! Let's get back on track. The retail price on these, according to the L'Oreal website, is $8.95, although they can be had for far less, and are often run on sale in drugstores. L'Oreal often puts $1 off coupons in coupon circulars as well, so keep your eyes peeled for those if you buy L'Oreal products! I spent $5.99 on mine, which is Bed Bath & Beyond's regular price with no extra discount; I believe Target and Walmart have similar pricing on this item. Sparkling Coral has a slightly different formula than the opaque cream finish lipsticks in this line; I find Sparkling Coral to give me a little bit of hydration. Not enough that I'd use it instead of lip balm, but my lips don't get thirsty under this, and I don't feel the need to layer it with a balm. It feels comfortable and cushiony on the lip, much more like a thick balm than a lipstick. While there is a faint waxy-floral scent, there is no taste.

On to the photos; for reference, I am wearing the shade built up on my lips. It is about as opaque as I can get it in the following pictures:

L'Oreal Sparkling Coral Lipstick

It is housed in the standard golden plastic Colour Riche case

Sparkling Coral! 

Sparkling Coral in the tube; look at all that shimmer! 
 Here it is swatched; on the right, I have 4 passes, on the left, just one:

Swatches of L'Oreal Sparkling Coral
And another shot of it on the lips, because it's just such a gorgeous color: 

L'Oreal Colour Riche Sparkling Coral Lipstick

Summary: Can you tell I really love this lipstick? It is a new favorite. The color is amazing, and the sheer-to-medium-coverage formula is really easy to pull off. Plus, it just brightens the complexion; it's a great summery tangerine. I have no complaints with the formula aside from the scent, and even though I seem to be more sensitive to the way products smell than most people (I can't wear Rimmel lipsticks, for instance!), this does not keep me from reaching for this lipstick; the odor is very faint and fades within a minute or two of going on the lip. I'd recommend this lipstick without hesitation; for the price, I'm not sure you can get a better wearable sheer tangerine-orange lipstick. If you've been itching to try out the orange trend this summer, I think this lipstick is a good way to test the waters!

Saturday, April 28, 2012

Bower of Blisse is now on Facebook!

Hi guys!

I am finally getting around to getting accounts and pages made for Bower of Blisse on other websites. Twitter is in the works, but I am happy to announce that Bower of Blisse officially has its very own page on Facebook! "Like" the blog over there and get a chance to directly interact with some fellow beauty lovers; it's also a great way for me to interact with you guys directly. Have beauty questions? Curious about something I've recently posted about, but know you won't come back to check on an answer in the comments section? Feel free to post about it over there! I am a dork for makeup, and I can't tell you how excited I am to get to interact you guys on a new platform.

Also, I'd love to hear what type of content you guys would like to see over there that Blogger may not be suited for. As you can probably tell, I'm excited to have a better platform for conversations between multiple people about things that may or may not be directly related to blog posts, but I am new at this!

And, if you guys have Facebook pages for your blogs, let me know in the comments and I'll "like" yours back! I am a Luddite and am just figuring out that Facebook is a great way to keep up with blogs, so I'm excited to hunt down some of your blog pages :P

Here's the direct link to Bower of Blisse on Facebook: http://www.facebook.com/blisseblog

I think now would be a great time to thank all of you for your support of this blog as well. When I started it, I thought maybe a few people would find what I was saying helpful, but am humbled by the outpouring of support I have received from the beauty blogging community. It's been immensely rewarding interacting with you all, and the blog could not have come this far without each and every one of you!

-Sarah

FOTD: Coral Siren


Ok, ok, I'm going to admit it publicly: I absolutely SUCK at thinking of names for Face of the Day looks. Really. I do. Sometimes I don't even make an effort. Sometimes (like today) I do, but still end up with something dumb-sounding. Admitting something is the first step, right? Now we can move past it.

I STILL haven't straightened up where I normally take photos, so no pictures of supplies. Sorry :( If you have questions about anything specific, please let me know and I'll do my best to get pictures/ swatches/ a review up here. I actually  have a post on the lipstick I used here (L'Oreal Sparkling Coral) planned for the next couple of days, so keep your eyes peeled for that. Spoiler Alert: I love the shade and formula on this. It's a new favorite, and has been living in my purse since I first put it on.

As for the look itself, I'll try to remember to the best of my ability what went into it, but this was a few days ago aaaand... Uh... I don't know that I'll remember everything. I will give a conservative guess, meaning I'll only list the products that I know for sure I was wearing. That also means that it is very likely there were a handful of other products that went into this that are not being mentioned.

Face: Clinique Redness Correcting Base, NARS concealer, MUFE Face & Body Makeup, some kind of powder...?, The Body Shop Bronzer in 01. Probably a few other products I do not remember. Hard Candy Blush in Pin Up, Inglot Eyeshadow in D.S. 464 (terracotta orange with shimmer) as blush.

Eyes: Inglot Eyeshadow in D.S. 464, Inglot Eyeshadow in AMC Shine 11, colors from the Naked 1 palette (Half Baked and Virgin definitely, as well as one of the darker browns in the crease), Urban Decay 24/7 eye pencil in Binge on upper lash line, MAC eyeliner in Industrial on lower lashline, Urban Decay 24/7 eye pencil in Half Baked on inner portion of lower lashline, Prestige My Biggest Lashes mascara, Prestige brow pencil, Ulta brow gel.

Lips: L'Oreal Colour Riche lipstick in Sparkling Coral


And here is the resulting look:


What do you guys think? I really like the way this turned out! That Inglot shade works well as a blush, aside from being tricky because of how pigmented it is. I still love brown and gold eyeshadows with blue liner; I think it really makes the copper tones pop! And don't even get me started on this lipstick; I know I'm not traditionally a big fan of the Colour Riche formula, but I love the way this one looks. The smell is still a little weird, but it goes away quickly... Anyway, there will be more on that in a post devoted to reviewing the shade.

Thursday, April 26, 2012

FOTD: Winter's Last Stand

I know I've been big into spring colors lately, gravitating towards gold, copper, coral, and turquoise. However, I was itching to wear some cooler colors today, and came up with a look that ended up reminding me of Winter! I've got some royal blue, grey, silver and champagne involved, and even though it doesn't feel like "summer" to me, I'm happy to rock this in the sunshine. Besides, I'm getting sushi for dinner tonight, and the blue and silver seem appropriate, right? Maybe? Like fish scales, a bit?

Just go with it.

Once again, I didn't take pictures of what I used. The area I usually use to lay out my supplies has been taking over with sewing notions... Whoops. I need to straighten up this weekend!

Here's the look:


And here is what I used:

Face: Clinique Redness Solutions Base, Almay Primer, NARS concealer, MUFE Face & Body Makeup, Illamasqua Cream Blush in Laid (on fullest part of cheek), Physician's Formula Youthful Wear Illuminating Pressed Powder, Wet n Wild Color Icon Bronzer in Reserve Your Cabana (as cheek highlighter), Hard Candy Blush in Pin Up (top of cheek), NYX blush in Taupe (to contour under cheekbone)

Eyes: NARS Smudgeproof Base, Inglot D.S. 501 (grey with shimmer, from lashline into crease), L'Oreal Infallible Eyeshadow in Midnight Blue (in crease, outer corner, and along lashline), Urban Decay Eyeshadow in  Verve (to highlight inner corner and blended above the crease), Urban Decay Eyeshadow in Bootycall (Blended above Verve and up to brow bone), MAC eyeliner in Industrial (on lower lashline),  Prestige My Biggest Lashes mascara, Stila Majorlash Mascara, Prestige brow pencil, Ulta brow gel

Lips: Revlon Lip Butter in Creme Brulee with NARS lip gloss in Female Trouble on top


Cheeks!

Eyes Open... 

And eyes closed

Lips

So, what do you guys think? Are you ready to kick your cooler colors to the curb just yet? have to say, I love the way this combination of lip colors came out! I'll have to think about coming up with a "summery" look using cool shades; navy, grey, and silver always feel unseasonable to me in April (going into May)! I know I'm talking about the seasons a lot with the looks I've been posting lately... I swear I don't believe in strictly sticking to "seasonable" shades, I've just been so inspired by the warm weather lately, in all the creative aspects of my life... Including the colors I reach for when I'm painting my nails or putting on my makeup!

Wednesday, April 25, 2012

NOTD: Rimmel Sunset Orange and Sally Hansen Disco Ball


Man, I have been feeling nail polish lately! As you can probably tell by the more-frequent-than-usual nail polish posts... I've been wearing brighter colors on my nails lately, and it's been a lot of fun. This is a manicure I wore a couple of weeks ago for a couple of days; it wasn't my favorite I've ever done, but I thought I'd share it with you anyway!

I picked up Rimmel's Lasting Finish PRO nail polish in Sunset Orange, which is an almost-neon (but not quite) coral, and the formula seems to be a cross between a cream and a jelly. If pressed to decide on one or the other, I'd call it a very pigmented jelly. I used two coats of Sunset Orange, then a coat of Sally Hansen's Hard As Nails Xtreme Wear in Disco Ball (small iridescent glitter in a clear base), and then another thin coat of Sunset Orange to top it, except on my ring finger, where I just used two coats of Disco Ball without topping it with Sunset Orange. As usual, I started with a base coat, and finished with a top coat.


The polishes I used:
Disco Ball and Sunset Orange

And here are the results:


You can kiiiiiind of see Disco Ball under Sunset Orange! 

And here's a better shot of the different colors that Disco Ball flashes:

BLING

What do you guys think? This wasn't my favorite combination, for a number of reasons. First off, the combination of Disco Ball's glitter and the color looks a little "young" to my eyes, like something I'd expect to see on a teeny-bopper. Not a bad thing, just not my style! Secondly, I like that you can see just a hint of Disco Ball through Sunset Orange, but Sunset Orange is a bit too opaque for this kind of treatment. Lastly, accent nails aren't my thing. I thought I would give it a try by using the same colors in a different way, but it still isn't my speed. Oh well, at least I tried it out, right?

Tuesday, April 24, 2012

FOTD: Spring is (finally) Coming!

Hi guys!

Sorry that my posting has been as regular lately; I've been getting busy with some other projects. Some are fun, some are not, and some are things I do not mind doing, and simply must be done. You all know how that goes...

However, I managed to snap a few pictures of the look I wore yesterday! No photograph of the products I used this time around, but I'm pretty sure I remember everything I used! I've been feeling like using more color lately, since we've been getting some warmer weather. For some reason that always makes me want to branch out from neutrals and head for teal, gold, and coral hues!


The Look 

Face: Clinique Redness Solutions Daily Protective base, Almay primer, NARS concealer, MUFE Face & Body Makeup, Smashbox Artificial Light Luminizing Lotion in Flash, NYC Loose Powder, Benefit Georgia (on center of face), The Body Shop Bronzer in 01 (around edges of face), Hard Candy Bombshell (as highlighter on cheek), NYX Taupe (to contour cheek), Benefit Coralista (on fullest part of cheek). 

Eyes: NYX Smudgeproof Eyeshadow Base, Inglot AMC Shine 11 eyeshadow (light gold) packed onto lid and into crease, Urban Decay Sin from crease to eyebrow, Urban Decay Virgin under eyebrow and on inner corner, Urban Decay Flipside in crease, Urban Decay eyeshadow in Smog in outer crease, Urban Decay 24/7 Glide-On Eyeliner in Binge on top lashline, Urban Decay 24/7 Glide-On Eyeliner in Baked on inner lower lashline, MAC eyeliner in Industrial on outer lower lashline, Prestige My Biggest Lashes mascara, Prestige brow pencil, Ulta brow gel. 

Lips: Smashbox lipstick in Melondrama, bareMinerals lip gloss in Cassis


Cheeks! 

Eyes

You can see the three shades of blue better here

Lips

I have to say, I am always disappointed by how sheer Flipside ends up looking on the lid if you are layering it on top of other shades, or trying to blend it. I used to wear it all the time, but I got frustrated with the sheerness. Maybe if I used it wet? Or maybe I need to add it last and not blend at all... It ended up just giving the gold on my lid a bit of an olive hue. If it's a shade you want, you'd better act now; Urban Decay is discontinuing it with the launch of their new eyeshadow formula!   I really liked Melondrama with a gloss over it; it toned down the coral a bit (which is what I wanted for this look!) and added a lot of depth.

Have you guys been switching up the shades you use as we go into warmer weather? If you don't change your shades seasonally, do you get inspired by the seasons? I don't think anyone should feel restricted to a certain color palette because of the season, but I know weather often puts me in the mood for different shades, and I take inspiration from the seasons.

Wednesday, April 18, 2012

NOTD: Hauling polish!

I went to Bed Bath & Beyond the other day and they had a bunch of new Spring displays out, plus I found a couple of Color Club shades that called to me... I ended up using three of my new polishes in the manicure I'm about to show you. It's not the type of manicure I generally go for, but I LOVE this combination! I don't ever want to take it off...

To do this manicure, I used a basecoat, two layers of Color Club's Wild Orchid (a slate blue/ periwinkle with silver, teal, and fuchsia shimmer), two layers of Color Club's Covered in Diamonds (iridescent flakies in a clear base), two layers of Revlon's Sheer Seafoam (a very sheer stormy teal), and a top coat. Too many layers? Maybe, but it was so worth it! Sheer Seafoam is really and truly VERY sheer, but I like how subtly it alters shades you put it on top of. I used to have a very sheer red top coat from L'Oreal that I had so much fun playing around with in the same way; in this manicure, it adds just a hint of milkiness on top of Covered in Diamonds, which keeps things from being too crazy. I'm going to go ahead and say that it classes things up, making this manicure look a little more expensive and refined than it did when Covered in Diamonds was allowed to shine at its full wattage. Is that a vague, unfounded statement? Yes. But it's my blog :) Which is the same excuse I am using for showing you gratuitous pictures of this mani:

That's my corset fabric in the background, FYI; I think I was crazy to put nail polish on top of silk, but it did not leak so I'm not sorry. Wild Orchid is a similar color, and I thought the fabric was too pretty not to show off just a little!

Left to right: Wild Orchid, Covered in Diamonds, Sheer Seafoam 
 Indoor light:


Natural light:

Holding Wild Orchid

Holding Covered in Diamonds; check out that glitz! 

Holding Sheer Seafoam

And here's a picture that shows off the sparkle:


Summary: I haven't worked with these enough to feel comfortable giving a review, but I'm on my third day of this manicure with only one real chip, which is good for me! My initial impressions are that Wild Orchid is gorgeous on its own; Covered in Diamonds' flakes are a bit sparse, and Sheer Seafoam is VERY sheer; this is not a true "jelly" level opacity. That being said, I like the look of all three of these polishes, and I can see myself using these a lot in a bunch of different combinations.

What do you guys think? Do you like layering polishes, or do you tend to just wear one at a time? Have you hauled anything exciting recently? I picked up a couple of lip and eye products from the LE displays along with Sheer Seafoam, I'll be showing those off in the coming weeks...

Sunday, April 15, 2012

Dupes: SOPI I Only Shop Vintage and Icing Skinny Dipping Beauty

Hi Guys!

In my last post, I showed you Sephora by OPI's I Only Shop Vintage, and I told you that I was disappointed to find that it was an exact dupe for the shade I had on my toes, Icing's Skinny Dipping Beauty! I always feel a little silly when I purchase two things that are exactly alike right in a row :( Unfortunately, I couldn't find the Icing polish when I wrote that post, so I couldn't tell you the name of the shade. I did a little hunting, and found it for you guys, and also took some comparison pictures. Is it as close a match as I thought it was? It's exact. I cannot tell the difference. And what's even better, the formula seems to be exactly the same (although I like the SOPI brush a little better). That being said, Icing's Skinny Dipping Beauty will only set you back $4.50 (less if you take advantage of their ongoing BOGO 1/2 off beauty special), whereas SOPI's I Only Shop Vintage is $9.50. If I were you, I'd definitely go for Skinny Dipping Beauty if all you care about is the shade and the formula.

How did I wind up with these two? Well, I liked China Glaze's Fast Track so much that I was hoping to find a similar shade, which is why I picked up Skinny Dipping Beauty at Icing. However, it's yellower, darker, and has more shimmer. That's ok! It's still pretty; I prefer Fast Track, but I enjoy having variations of shades that I love. How did I end up with SOPI I Only Shop Vintage? I saw it in the store and really, really liked it! It never even crossed my mind that it looked familiar... Oops. Guess I am really digging these milky browns with gold shimmer!

Just a note; while going through the pictures, I noticed that Skinny Dipping Beauty looks a little bit darker than I Only Shop Vintage. This wasn't the case in real life; they were indistinguishable. I'm not sure why it photographed that way (especially in the bright light), but I think the problem is that my middle finger is much longer than my index finger and I couldn't get the nails to rest at the exact same angle, so the light hit the fingers differently. Trust me; you're not going to be able to tell the difference when they're on the fingers. Similarly, the different shape of the bottles makes them look a little different.  I showed these with Fast Track since a lot of you either own this, have seen it in person, or have seen lots of swatches; I thought it would help give you a better idea of the shade of I Only Shop Vintage and Skinny Dipping Beauty.

Bottles, with flash:
Left to Right: China Glaze Fast Track, Icing Skinny Dipping Beauty, SOPI I Only Shop Vintage

Bottles without flash:
Left to Right: China Glaze Fast Track, Icing Skinny Dipping Beauty,  SOPI I Only Shop Vintage 

And the labels, just for kicks:


Direct sunlight:

Left to Right: Fast Track, I Only Shop Vintage, Skinny Dipping Beauty

Indoor light:
Left to Right: Fast Track, I Only Shop Vintage, Skinny Dipping Beauty

Left to Right: Fast Track, I Only Shop Vintage, Skinny Dipping Beauty

So what do you guys think? Are you going to go for either of these shades? Icing is known for their dupes of higher-end nail polishes (they dupe a lot of Deborah Lippmann glitters, for those of you who are looking!) and they have a lot of really unique shades. Have you guys scored any awesome finds there? I still feel silly for having two bottles of the same polish, but I'm excited to have found such a close match for those of you who like the color and don't want to pay SOPI prices!

Thursday, April 12, 2012

NOTD: SOPI I Only Shop Vintage

Sorry it's been a few days since my last post... If it's any consolation, I've been more active than usual on my other blog.  It's mainly about my sewing projects; if you're interested in seeing a couple of things I've made, head on over! I've also got a drawing or two up there, and I have decided to start sharing interior design ideas and other creative ventures on that blog as well, although I've only brought that up in the most recent post. I am going to try to be better at updating that blog more regularly, in an effort to help motivate me to spend some time on creative endeavours; I always forget sewing, drawing, and creating are what keep me sane! Although I have recently fallen into a sewing project and I've been putting the majority of my free time towards that rather than this blog, I promise I haven't forgotten you! I'm hitting my stride and finding a balance.

I've just got a quick post for you today, showing off Sephora by OPI's I Only Shop Vintage, a milky bronze with bright gold flakes and shimmer.  I was a little bit heartsick when I put this on and realized it was a nearly exact dupe for an Icing polish I'd picked up only a few weeks back... Oops! I guess that's the down side of being drawn to the same types of colors over and over again. I cannot find the Icing polish right now, but as soon as I can I'll let you guys know the shade name; I'll also throw a comparison pic up here as soon as I get around to taking one. However, I had the Icing shade on my toes when I put this on my nails, and from holding my fingers down to my toes, I literally could not tell the difference... The Icing shade is less expensive, although I really like the SOPI formula... But the Icing shades are regularly BOGO, so if you're planning on getting a couple (like maybe one of the several Deborah Lippmann glitter dupes!), you can get a really great deal. Actually, when I bought The Icing's version, I thought it would be very similar to China Glaze's Fast Track, which I love. They're cousins, but definitely not dupes; however, I Only Shop Vintage is the same type of shade, so if you like Fast Track, you'll probably like this one as well. 

The SOPI polishes are $9.50, and come with .5 ounces of product. Like I said above, this is one of my favorite nail polish formulas; they tend to be very slightly on the thicker side, but not so much that they get gloppy; just enough that they stay where you put them on the nail. They seem to do a little bit of self-leveling as well, which makes getting a nice smooth, perfectly applied look a cinch. Several of my absolute favorite nail polish shades are by SOPI! 

Ugh, I should have cleaned up my cuticles a little before taking these pictures, sorry... 

I Only Shop Vintage, indoor light


SOPI I Only Shop Vintage, direct sunlight
 If you click on this next one to enlarge it, you'll be able to see the small irregular flakes of bright gold foil in this polish. It's a really interesting texture, especially against the milky brown base!

SOPI I Only Shop Vintage, direct sunlight 

Summary: This is a gorgeous shade, but it's not undupeable. That being said, the formula is great, and wear time is a little better than usual. If you are not a fan of SOPI's formula or don't particularly care one way or the other, head down to The Icing and grab their dupe for less than half the price! I'll let you guys know the shade name when I find it! 

Thursday, April 5, 2012

New (to me!) Inglot Shadows

A little while ago I managed to pick up 4 more Inglot eyeshadows while at their new counter in the downtown San Francisco Macy's. Anyone been there lately? What is up with the new tropical theme in the cosmetics department? I feel like I'm in Vegas or something... I digress, there is now an Inglot counter, and I love the store for that. They were out of the 4-pan palette when I bought the shadows, which gave me some time to think about my future Inglot needs, and I went ahead and purchased a 10-pan freedom system palette. Eventually I think I'll transfer my older 4 shadows into it with my newer 4, but I left just the new ones in it for the photos so as to avoid confusion about which shade is being referred to.

If you've never used Inglot before, their shadows are to die for. I especially love their matte formula. They sell many of their shadows as part of what they call the Freedom System, where you buy pans on their own that fit into their line of palettes (or you can use a universal palette like a Z-palette, if you prefer). The shadows contain .09 ounces of product, and are $5 each; the price of the palettes varies based on size. You can check out all of their product offerings at their website for more information. I love that you can make your own palettes so easily, and that they have soooo many shades to choose from. I'm always so surprised how flattering the shades I picked out are, and then I remember it's because I was able to pick them all out myself from such a huge offering that I never had to compromise. I tend to pick out shades that I think will be good neutrals to travel with and do an everyday eye with, since those are the shades I use the most often, figuring I have plenty of crazy colors in my Urban Decay palettes and other sets like that. So, sorry I don't have any kickier colors to show you; rest assured, if that's your thing, they have beautiful brights!

The shades I picked up are :
Matte 352 (matte bright ballerina pink)
 Matte 390 (matte pale dusty rose/mauve)
 D.S. 461 (wheat-taupe with gold micro-glitter)
AMC eyeshadow 53 (purple-brown with rainbow micro-glitter)

Got that? I hate the finish/number designation rather than an actual name, just because it makes it so much harder to keep them straight. I think I may have confused two in my last post, since I had to lift up the pans to read the color... I think I may have scrambled the two matte shade names in the process. Oops. I should go back and investigate that sneaking suspicion...

I have such a hard time deciding between which pictures to show and which to leave. I'm going to err on the side of sharing too many pictures in this instance, since I know a lot of people have no way of getting to an Inglot counter on their own, and since it can be hellish trying to find swatches and reviews of their things online.


The palette

Shades in the pan, natural light Top Row L-R: 53, 461; Bottom Row L-R: 390,  352

This next one is purposefully fuzzy, since you don't need a sharp picture to see the color, but you DO need a fuzzy picture to see all that sparkle! Click for a closeup, especially of 53!
Indoor light. 
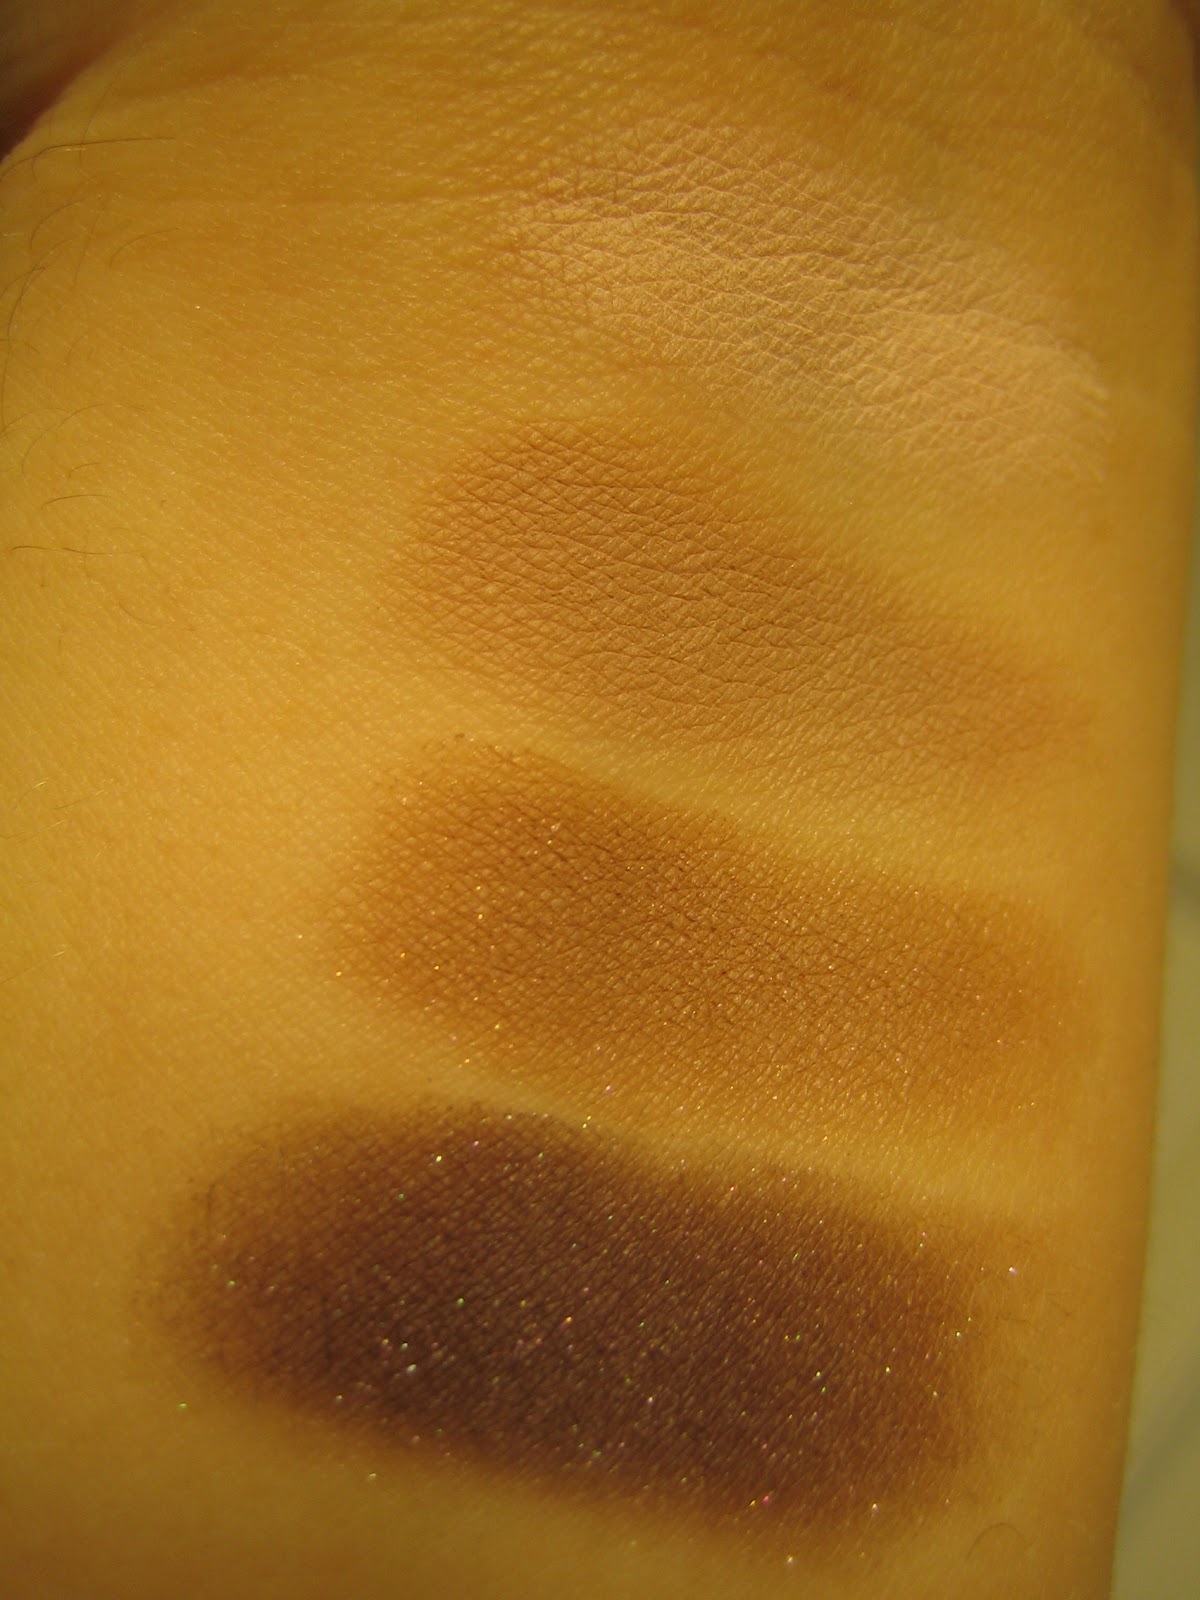
 In the following swatches, top to bottom we have 352, 390, 461, 53:

Indoor Light

Shaded natural light

On my monitor, the following swatches are the most accurate to what I see in the pan:

Direct natural light 

Aren't those amazing? I love that pale pink for a highlight; it doesn't have any grey or brown in it at all, so it just perks everything up. And I cannot get over how lovely the mauve matte is; it's such a subtle color, but it's very pretty. And those sparklies... I'm over the moon with this grouping, they're easy to wear.

Here is an eye look using these shadows. The only supplies I used on my eyes other than these four shadows were Urban Decay primer, Prestige brow pencil, Ulta brow gel, and Prestige My Biggest Lashes mascara. No eyeliner or other eye shadows.


Summary: Inglot makes high-quality shadows with a noteworthy matte formula, in an incredible range of colors. I love that you can buy shadows inexpensively and build your own palettes. My only complaints are that I wish there was somewhere on the back of the palette to write down which shadows are where, and that it was easier to get the pans out of the palettes to move them around; say a little lip in one corner or something you could grab more easily with tweezers or a fingernail. Their return policy isn't great, so ordering online isn't too attractive to me, but for those of you who live near a counter, definitely check them out! Especially now that they are branching out into some of the bigger Macy's stores, they are becoming more accessible. I know ordering online is the only option for lots of you, and while I get nervous if I can't poke at things in person, I would wholeheartedly recommend exploring their eyeshadows if you are curious! I've only had good experiences with the shadows (although I did have a lip pencil break on me! Grrr).