Wednesday, February 8, 2012

Revlon Super Lustrous Lipstick: Mattes

Good Morning! What? It's after noon? Sorry, I got a late start today... But no matter, because I have been waiting to write this post for awhile; I absolutely LOVE Revlon's matte lipstick formula, and I am so excited to finally get swatches and pictures of my collection up here for you guys to see. If you have trouble finding a matte lipstick that doesn't dry your lips out and wears well, this may well become your new favorite.  They're amazingly creamy without being messy, and feel like velvet on your lips; they don't pill, they don't emphasize lip lines or dryness, and they don't suck the moisture out of your lips. I like the matte formula better than Revlon's cream formula. Seriously, I think the only matte formula I've come across that I like as well is NARS' Velvet Matte Pencil and the Pure Matte Lipsticks, and even then I'm not prepared to say that I like those better than Revlon's formula; they tie. And the Revlon lipstick is about 1/5 the price, so we have a clear winner in that department in Revlon's formula. You can find Revlon's Super Lustrous Lipsticks for right around $5, depending on where you're buying; I got most of mine from my local  Bed, Bath & Beyond  that has a Harmon inside (which I've found has the best drugstore cosmetic prices), but you can find these anywhere. The matte formula are mixed right in with the rest of the finishes, so if you just scan the display, you'll find a few scattered throughout. 

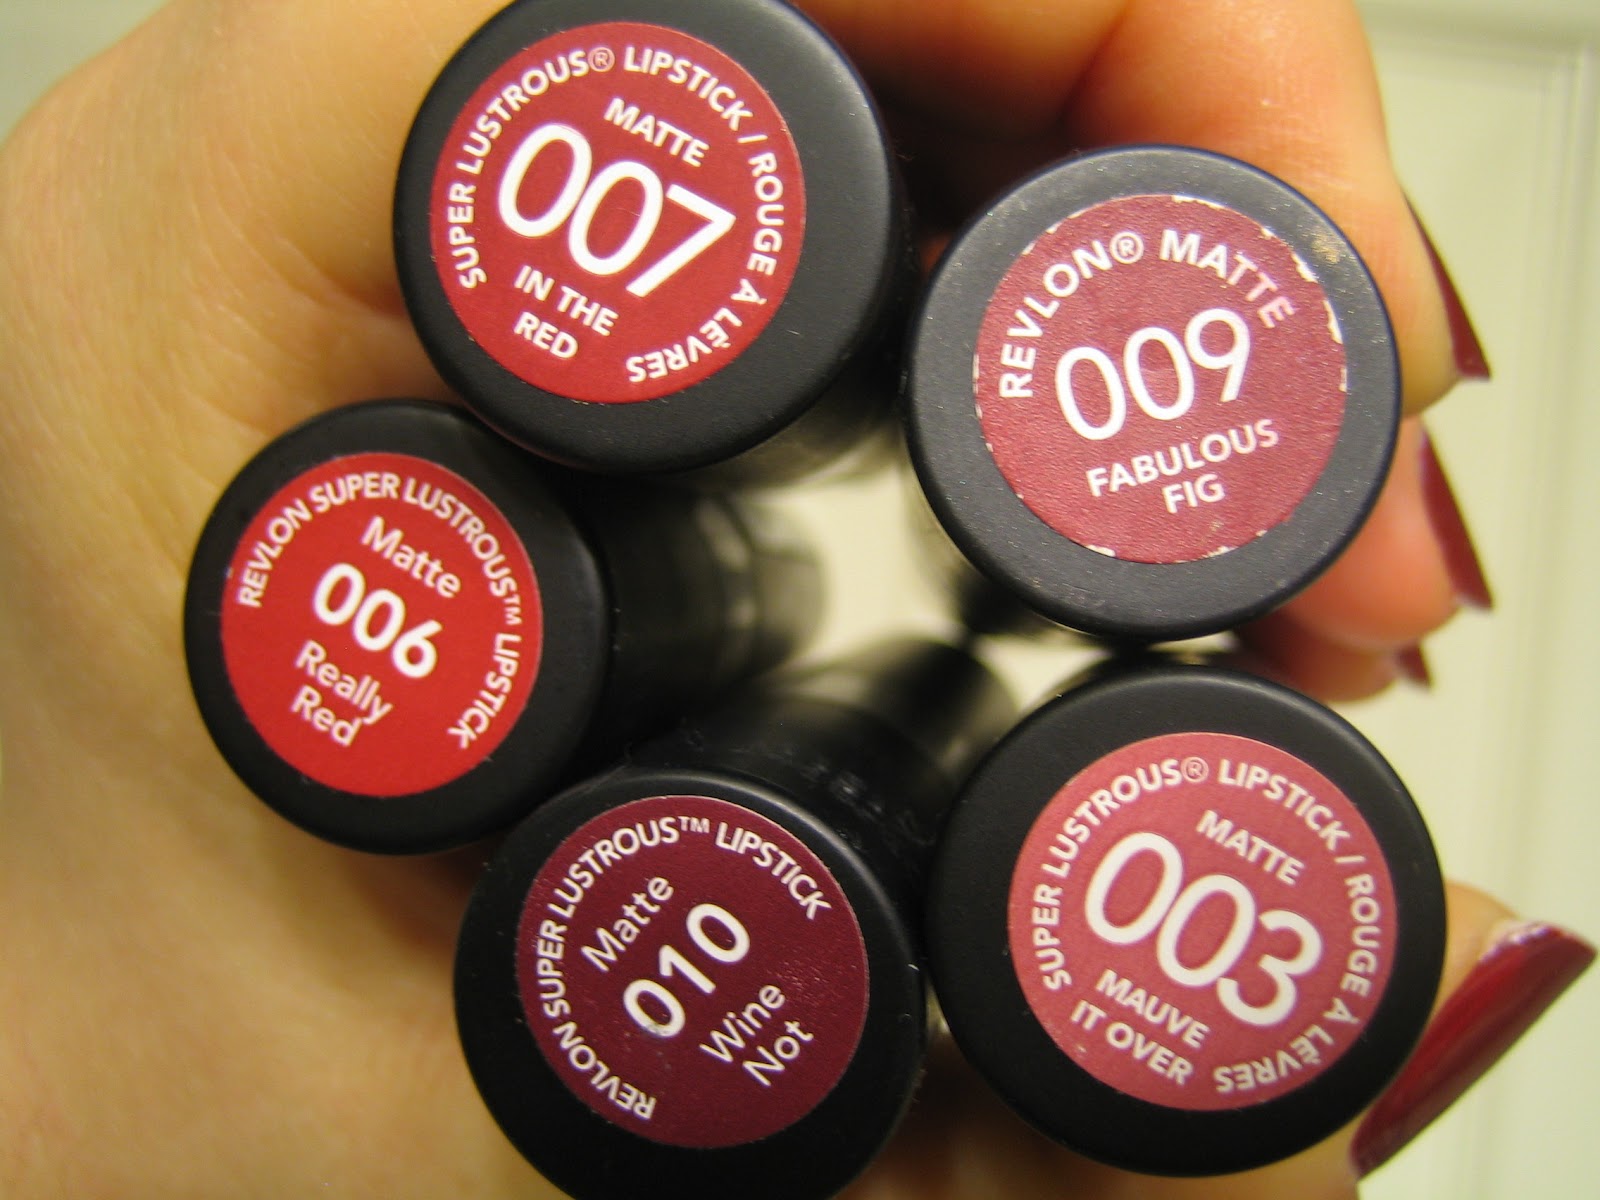
I have five of the matte formulas; they're numbered from lightest (lowest number) to darkest (highest number) which I find helpful; the shades I have are 003 (Mauve it Over; a beige mauve shade), 006 (Really Red; a bright blue based red), 007 (In the Red; a bright, slightly orange-leaning red), 009 (Fabulous Fig; an orange-red shade with a touch of brown), and 010 (Wine Not; a deep berry shade). I don't have any of the nudes or pale pinks, although those shades are available. As you can see, my label for Fabulous Fig is different from the rest; I've had this shade for a few years, and the rest of the labels are the current style.

Revlon Super Lustrous Mattes
 I've done all my swatches from the lightest shade to the darkest, and from the smallest number to the highest; for instance, on my arm below, the top of the swatches is Mauve it Over (003), the next one is Really Red (006), below that is In the Red (007), below it is Fabulous Fig (009), and below that one is Wine Not (010).

Revlon Mattes Swatched 
First is Mauve it Over. I'm not sure how I feel about this lipstick on me; I like it just fine in pictures, but in real life I feel like it may be too close to my skin tone, especially in the matte finish. 

Revlon Matte Mauve it Over

Revlon Matte Mauve it Over
Next up is Really Red: 

Revlon Matte Really Red

Revlon Matte Really Red

And here we have In the Red:

Revlon Matte In the Red

Revlon Matte In the Red

 ...And Fabulous Fig!

Revlon Matte Fabulous Fig

Revlon Matte Fabulous Fig

And finally, Wine Not:

Revlon Matte Wine Not

Revlon Matte Wine Not

Summary: This is a really wonderful matte lipstick formula, and a great lipstick formula in general; I like its formula better than the rest of the Revlon Super Lustrous finishes' formulas! It's easy to find and its inexpensive; the colors available hit all the basics. My only complaint is that I wish they'd expand the line to include even more shades, since I am such a fan! And, if you're looking for a good retro red for a pin-up lip, this is a great formula to look into, with a red for you cooler toned vixens (Really Red) and one that leans warmer as well (In the Red)! 

Do you guys have any of the Revlon Matte lipsticks? What do you guys think of the formula? 

Tuesday, February 7, 2012

Double Chocolate & Cherry Cookies!

Hello!

I know this isn't makeup, but I see this as a forum for sharing all sorts of creative endeavors, even if the focus is makeup. I know I like it when bloggers I follow post about other hobbies and creative pursuits, so I decided to offer you all selective glimpses into the rest of my life. As long-time followers of my blog may have picked up on, my boyfriend and I recently moved into a new house! This is very exciting news, for many reasons. One of the numerous upgrades has been in the kitchen department. Meaning, we now have a reliable oven, counter space, and a stand mixer on loan from my boyfriend's mother. I have been baking on and off for the last few years, but I'm new to cooking, and finding vegetarian recipes that suit my boyfriend's tastes (he's a picky vegetarian!) and my lack of cooking expertise has been a challenge; I figured maybe a few of you would appreciate hearing about some of the simple, delicious vegetarian recipes I've found! This first post will be about baking, though.

This was my breakfast. Don't be too jealous.


I saw this recipe, and immediately began craving these Double Chocolate Cookies. However, I am a tinkerer, and never leave well enough alone; I altered the recipe very slightly by reducing the number of chocolate chips called for and adding dried cherries to add a bit of tartness to offset the richness of the chocolate cookies. They are amazing. I cannot believe how delicious these turned out.  I have to give all recipe credit to Annie of Annie's Eats cooking blog, and I believe she found the recipe and altered it slightly to suit her tastes...

My beautiful breakfast cookie, after I broke it in two. I microwaved it so it would soften up and get all melty again:

MMMM.

I'll transcribe the recipe here as I made it for ease. Please note that this has been changed ever so slightly from the original by the addition of dried cherries, the reduction of chocolate chips, and the use of regular table salt rather than coarse salt. (I took one look at the coarse salt, envisioned one of the six giganto flakes ending up in my mouth embedded in the middle of delicious cookie, and promptly dumped out my teaspoon and went with a slightly smaller quantity of table salt instead.) I'm also altering the directions to better reflect what I did (because I don't follow instructions to the letter, but my cookies turned out great!), but please remember that not all of the directions you'll see below are completely original; they have been adapted from directions from this blog. The recipe is supposed to make 12 very large cookies; I flattened my dough into a disk, and then marked it into 12 wedges, but somehow only ended up with 10 cookies. The dough was sticky and messy, and it was hard to only break off my neatly divided wedge. So I somehow ended up with 10 really REALLY big cookies. Do not plan on eating one of these in one sitting, unless you want to be full for the next 8 hours.

Yield: 10-12 large cookies

Ingredients: 

1 cup (2 sticks) cold, unsalted butter, cubed
1 and 1/4 cup sugar
2 large eggs
1/2 cup dark cocoa powder (I used Hershey's Special Dark, found in the baking aisle of any old grocery store, and it worked out beautifully)
2 and 1/4 cups all purpose flour
Scant 1/4 teaspoon salt (don't go quite all the way to the rim of your measuring spoon!)
1 tsp. baking powder
2 cups semi-sweet chocolate chips
3/4 cup dried cherries

Directions: 

Preheat the oven to 350 F. Line 2 baking sheets with parchment. Combine the butter and sugar in the bowl you plan to mix them in. Beat together on medium-high speed until light and fluffy (2-3 minutes). Blend in the eggs one at a time, scraping down the bowl as needed. Mix in the cocoa powder until well blended. Add the flour, salt, and baking powder to the bowl one at a time, blending as you go, and mix on low speed just until incorporated. Be careful not to over-mix. Fold in the chocolate chips and dried cherries with a spatula, then transfer the dough to a work surface and knead briefly by hand to be sure the ingredients are well combined. The dough will be sticky; I put foil on a heavy cutting board and kneaded on that surface, but in the future, I'd make sure the foil (or parchment or whatever you prefer; I didn't want to work on a floured surface, in case that added too much flour to the dough) was anchored down under the cutting board on both sides so it wouldn't stick to the dough as I folded it. I didn't knead it very much at all, just enough to make sure that the ingredients were mixed up evenly; over kneading will change the texture of your finished cookie.

Flatten the dough a bit until you have a disc; divide it into 10 or 12 wedges, and then tear each wedge off, and roll it into a ball and place it on your cookie sheet. Flatten it slightly by hand; these will not spread out on their own very much as they bake. Once all your cookies are on the sheet, put them in the oven and bake for 16-20 minutes. It will be difficult to tell when they are done since the dough is dark and they do not spread much as they bake; I cooked mine for about 18-19 minutes, and they were fine, but it will depend on your oven. I very unscientifically stuck my hand in the burning hot oven and poked at the cookies to see if they felt doughy or a bit firmer.  If you can't fit all of your cookies in the oven at one time (I had to bake each cookie sheet separately), put the sheet back in the fridge to keep the dough from getting too warm while you wait for the first batch to bake. I took my second cookie sheet out of the refrigerator about 5 minutes before they went in the oven (so it was only in the fridge for about 10-12 minutes total), and set the sheet on top of the oven so it could warm up to room temperature before it went in the oven.

Happy Baking!

I'm planning on including a few more cooking-related posts. Do you guys cook very often? What kinds of recipes are your favorite? How do you find new recipes- blogs, family, cookbooks? My mom was a great cook but she never taught me how to cook, so I'm just kind of figuring it out through trial and error. I had a pizza disaster, but other than that, I haven't messed anything up too royally-- yet!

FOTD: Soft Pinks and Nudes

I felt like getting dressed up over the weekend, and my boyfriend and I had a couple of errands to run (yay mall and Target!), so I figured that was as good an excuse as any to pull out a new pale pink blouse and grey plaid skirt I'd been wanting to wear.  I had Valentine's Day on the mind (I know, I know, 10 days away... But still, I've been trying to think of something to do since I am the planner in this relationship) and was inspired by the soft petal-pink of my blouse, and ended up doing a sweet, romantic look that would work for the office or date night. It's also relatively quick and simple, when compared to a lot of the looks I do; I'm used to using 3 or 4 cheek products, a bronzer, a highlighter or two, maybe 2 powders, more eye shadows, etc... than what I ended up with here, and I was pleased with the cleanness of the result. I tend to just load on more product until I get the color or look that I'm going for, despite knowing deep down that less usually is more! This might become a new go-to "quick-ish" look (definitely not the most streamlined makeup look I do, but not the most complicated, either)!

The Goods:


Face: I started off with Almay's Smart Shade Primer, then followed with Rimmel's Lasting Finish 25 Hour Foundation and Hard Candy Glamoflage to correct dark circles under my eyes and redness. I set it all with NYC's Smooth Skin loose powder. I used Physician's Formula Shimmer Strips in Healthy Glow (focusing on the pink shades) all along the fullest part of my cheek, and then followed with MAC Vintage Grape (focusing on the medium-dark area) on the apple of my cheek and the bottom portion of the cheekbone.

Eyes: I used MUFE Aqua 16 as an all-over base, and then used Sally Girl powder eyeshadow in Mauve from lashline to just above the crease. Urban Decay Toasted (from my Naked palette) went on the lid, and Revlon Vintage Lace was used to highlight just under the eyebrow and the inner corner of the eye. I used  Prestige Brow Perfection (in light/medium) to fill in my brows, and Anastasia  Brow Gel in Caramel to set them. I used the metallic Plum end of an old Ulta gift set eyeliner (I'm not sure if this is still available, but any plum eyeliner would do) to line the top and bottom lashes, getting it as close to the waterline as possible (it did not stay put there). Finished off the eyes with L'Oreal Voluminous Million Lashes. I should add that this no longer flakes on me; turns out it does much better once it's aged a bit, although it still doesn't define lashes the way I wish it did.

Lips: NARS Velvet Matte Lip Pencil in Bettina (dusty pale pink) topped with Bare Minerals gloss in Wild Honey (pink with gold flash and shimmer).

The Look: 


The next photo is the best shot of my blouse I got; I need a better method to take pictures of my outfits for you guys! You can't really see it here, but the neckline is cartridge pleated and has a narrow V-neckline with ruffles down the front. The skirt was grey plaid A-line, very basic, ends just above the knees. I wore it with black boots.  I like this blouse so much, I want to talk about it a little bit more; I have such a hard time finding blouses that fit correctly as I am busty, but this one has a zipper on the side rather than buttons down the front, and it's marvelous! Plus, I got it on sale from Express; it was originally $55, and I got it for less than $20 after tax. I love end of season sales!

Sorry for the messy towels in the background! My new bathroom is this awful green color, I can't wait to paint... 

Cheeks! 

Eye!

Lips! 

I am over the moon about my new blouse, I've worn it twice in the last week! I'm also really pleased with this lip color combo; it's a really glowy pale pink/ nude look that works with a ton of different eye and face combos. I don't think the photographs did it justice. I also suspect that Bettina is really close to Cover Girl's lipstick Romance; I'll do a comparison in the near future for you guys, just as soon as I remember to get them both out and take a good look at them! Bettina may be more yellow-pink and Romance might be slightly cooler.

What do you guys think? Do you have any big Valentine's Day plans? Do you celebrate? I usually just use it as an excuse to get a little more dressed up than usual and have a date night; I don't think we're going to do anything big this year, either.  My (overly) ambitious Disneyland Road Trip idea got shot down, so now everything else pales a bit in comparison :P

Monday, February 6, 2012

L'Oreal Infallible Never Fail Makeup

I have so many looks and products photographed and ready to go right now, I couldn't decide what to post today! I am falling behind on posting photographs, but I've been taking pictures as regularly as ever... Bad combination! I've also decided from here on out to make my closing thoughts more of a summary of the post, since I tend to write rather lengthy posts. If you just want a run-down of the important points, head to the bottom and read that paragraph!

Anyway, I finally decided to show you L'Oreal's Infallible foundation; I've been using it for quite awhile now, on and off. You'll be able to see in the photos that I'm nearly through my bottle of foundation; seeing as how I've been using it for awhile, I figured I had better let you guys know what I think of it before I run out and have nothing left to photograph! So, let's start off with the basics; according to L'Oreal's website, their Infallible Never Fail Makeup is supposed to last 18 hours and look flawless, without needing any sort of touch-ups. They claim it has a "vitamin and mineral complex [that] combats the signs of fatigue"; smoothing pigments are meant to resist rubbing off and fading, continuous concealing will hide imperfections. It contains SPF 20 to protect skin from sun, and is also supposed to resist humidity while containing oil-absorbing mattifiers to fight shine. The suggested price is $14.29, and it comes with 1 ounce of product. A little bit on the pricey side for a drugstore foundation, but still half as much as I was spending on my MUFE Face and Body Makeup (which I guess I've never posted about...? I should, seeing as how I've been using it pretty consistently since I was 17). I was going to Florida and wanted to see if I could find a less expensive foundation that would hold up to extreme heat, humidity, and persperation. I'd heard good things about long-wearing foundations, and after reading various reviews, L'Oreal's Infallible Never Fail Makeup and Rimmel's 25 Hour Foundation (which I used as a base in this look) decided like good products to try. I bought both, and have gone back and forth between preferring one over the other. The Rimmel foundation is about half the price of the L'Oreal, but it doesn't have a pump (which can get messy and annoying), the lightest shade is a little too dark for me, and I feel like it gets oilier faster. However, the L'Oreal formula is thinner and less creamy, which makes dry skin show up more under it, so I have to be sure that I've moisturized the heck out of my face and exfoliated any dry patches, especially during winter. Neither one holds up to its 18 or 25 hour claims. The L'Oreal makeup also provides slightly less coverage, but with a more natural texture; I'd describe this as a medium coverage foundation. As far as I know, it is not buildable; if you try to add a second layer, you run the risk of the product pilling. The texture of this is thin and almost watery; it's actually a kind of weird texture. However, this doesn't adversely affect application. I always apply with clean hands and fingers; I have much better luck getting a natural texture that way.

So, what do I think of the L'Oreal Infallible Never Fail Makeup? It's a really decent formula for a really decent price, but it's certainly not my favorite foundation. It's not what I reach for when I know I'm going to be photographed a lot, or want to look fresh all day long, or for special occasions. When I bought this, I realized I probably should have gotten the next-darker shade, but now that it's winter and I'm paler, Soft Ivory (602) works just fine. Unfortunately, this does not hold up all day. If I wear my glasses, as soon as I take them off, I have patches of bare skin from where the nose-rests were sitting. This rarely happened with my beloved MUFE Face and Body Makeup, and when it did (as a result of extreme heat, humidity, etc...) it was not nearly as noticeable; I could pat on some powder and it would look just fine.

I started wearing this with primer, and it holds up much better that way. It is a perfectly acceptable foundation when I add primer to my routine.  However, I feel like if I have to purchase two products to use together to make this work, I might as well spend that money on the more expensive, nicer product I can use alone. When I do use primer under my MUFE makeup, I use much less of the MUFE foundation, since it seems to spread out more easily and in a thinner layer without compromising coverage; with the L'Oreal foundation, I use just as much over primer as without primer, so it does not help to conserve product by using primer. My other problem with this foundation (and with a lot of foundations, actually...) is I feel like the texture gets wonky wherever I try to add concealer, especially on my nose. I tried to take some pictures of this, but I don't think they show what I'm talking about. Anyway, I have a bear of a time trying to find foundations that I'm 100% satisfied with, especially when I am trying to find less expensive drugstore alternatives, and can't try the product on before purchasing it. Maybe I'm just super picky, and I'm sure that these texture issues aren't something noticeable until you get about a foot away from my nose, but it's something that bothers me.

Would I re-purchase this? I'm still trying to decide if I would. I think it's just fine for every day when I want to wear makeup to school or out to run errands, and don't want to use anything expensive, but I'm still a little bit frustrated every time I take off my sunglasses and see red patches where the nose-rests were, or after I've finished my makeup I take a look at the weird patchy texture on my nose from where concealer and powder have affected the original foundation. I might try Revlon's long-wearing formula; I might try L'Oreal's True Match. If anyone has any suggestions for an inexpensive foundation that wears well and provides a natural looking texture, please let me know!

So, here I am after moisturizing, but without a stitch of makeup:


I have sensitive skin that tends to be dry. Because of this my main concerns are products that might emphasize any dry areas I have (thankfully I have a routine that keeps my skin fairly well moisturized), and redness. I always have redness on my cheeks down to my jaw, and on my nose. I also want something with enough coverage to help neutralize darkness under my eyes. Every once in awhile, I get the occasional blemish; you can see one on the second picture above, on my cheekbone. I don't need a full-coverage foundation; my goals are to get an even canvas to apply makeup onto, and to keep a natural-looking texture.

Here's the foundation; my bottle is so messy after 9 months of having it. If you like foundation that stays nice looking, this isn't for you; I've never had a bottle get this nasty looking!


And here it is, blobbed on the bottom, blended slightly on the top so you can see a bit of the texture. See how thin it is on top? There are no thicker areas like a creamier texture would show after minimal blending, and it doesn't smooth over the fine lines on my hand; it's thin enough that it doesn't cushion over those areas. I don't find this to be a problem on my skin, but if fine lines and wrinkles are a concern, this may emphasize them. I can't say for sure if this would be the case, though.

L'Oreal Infallible Foundation

And here I am wearing the foundation over Almay Smart Shade Primer; I'll review the primer separately, but despite it's claims to help color- correct, I think it actually made my skin redder on the day I took these pictures. I was having an extra sensitive skin day. However, it calmed down by the time I got my foundation on, so that's not a concern in these pictures; I'm just letting you know that the primer hasn't affected the way my skin looks between the pictures of my clean face, and the pictures below where I'm wearing foundation, it's just there to help the foundation wear longer. Notice the difference in redness around my jawline, on my nose, and also where that blemish is on my cheekbone.  It covers everything enough for my liking; I usually add a touch of concealer after this step under my eyes and on my nose, but you can see that this adds significant coverage on its own.

Wearing L'Oreal Infallible Makeup

Wearing L'Oreal Infallible Makeup

With L'Oreal Infallible Makeup


Summary: 

Who would I recommend this makeup to? To people who only need to wear foundation for a few hours (or who are willing to wear a primer under this foundation to make it last a full 8-10 hour day), and who want a really decent, affordable foundation. If you don't wear concealer on top of your foundation, you might have fewer texture issues than I do; on areas of my face where I don't use concealer, the texture of this looks much more natural than many other foundation options. However, it doesn't play well with concealers or a second layer of foundation, so be warned! You may encounter pilling, and you may have to fiddle around to get a combination you like. I don't dislike this product, but it doesn't live up to its claims, and it's not my favorite foundation when I am comparing it to brands that are twice its price. In the drugstore arena, it's a top contender among the 6 or so readily available drugstore formulas I've tried.
Saturday, February 4, 2012

Poppy King for No. 7

Hello, all!

Sorry for the brief hiatus, school started two weeks ago, and I finally had to get my butt in gear and go down to campus and get enrolled in my "classes" for this coming semester. I say "classes" as opposed to classes since I am technically just focusing on researching and writing my thesis this semester (it's on Richard II, for curious parties...), and it is a very strange feeling to not have a syllabus and assigned reading, class meetings, etc...

Anyway, I was at Target last night and saw that the Poppy King collection for No. 7 was on clearance. Seeing as how I had already photographed my purchases from that collection, I figured I had better get the photos up before it was too late!

If you aren't familiar with the collection, Poppy King (of Lipstick Queen fame) has designed a small release with Boots No. 7, which are available at Target stores in the US. It features 8 shades available either as lipstick or lipgloss. I originally picked up a couple of the lipsticks and three glosses, which are what I photographed here. Of course, when I saw they were on clearance for $5.50 (they were originally $10), I snagged a couple of the shades I hadn't gotten originally! I may post those separately later. I have to say, I was very pleasantly surprised by these; the packaging is chic and cute, much nicer than what I expected from a product readily available at Target. The lipstick cases are very small brushed lavender metal, and the glosses have brushed lavender tops with tiny polka dots on it. The lipsticks and glosses are both really great formulas. I'm not sure if this is the standard No. 7 formula or not, since I don't own any other lipsticks or glosses by them, but the glosses are moisturizing and cushiony without being sticky at all, and have a nice amount of pigment; they tint my lips, but aren't opaque. They also feature doe-foot applicators, which are my favorite lipgloss delivery device!  The lipsticks are moisturizing and offer sheer to medium buildable coverage (at least the ones I got!). The lipstick shades are Power (a bright yellow pink) and Seduction ( brown-burgundy). Power is a bit more opaque than Seduction, and offers the faintest hint of shimmer, whereas Seduction is a glossy sheer cream. The gloss shades are Seduction (brown-burgundy), Power (bright yellow leaning pink) and History (a read that reads a touch pink).  Lipsticks offer .12 ounces of product, glosses a full .2 ounces.

So. Lots of pictures. Be warned!

The boxes. Cute!


And here are the products out of the boxes: 


Poppy King No. 7 lipstick case

Poppy's signature is on the twisty part of each lipstick! 
 These are fairly small lipstick cases, even though there is a normal amount of product in each one. I took a picture next to a NARS lipstick for comparison purposes:

Poppy King for No. 7 (right) next to a NARS lipstick (left) 
 Lipstick Swatches:

Seduction on the left, Power on the right
 Lipgloss swatches! You can see that while these aren't opaque glosses, they're very pigmented and almost a little bit milky. They look really nice and cushiony on the lips.

Left to Right: Seduction, Power, History

Wearing Seduction Lipstick

Seduction Lipstick

Wearing Power Lipstick

Power Lipstick

Wearing Power Lipgloss

Power Lipgloss

Wearing History Lipgloss

History Lipgloss

Wearing Seduction Lipgloss

Seduction Lipgloss

See any you like? If so, run out and grab them while you still can! I couldn't find these on Target's website, but they definitely still had a ton at my local store on a clearance-designated end cap in the beauty section. I thought these were great quality for the price at full price, so for half off, you can't afford to miss out on these if they sound like something you want!