Thursday, April 12, 2012

NOTD: SOPI I Only Shop Vintage

Sorry it's been a few days since my last post... If it's any consolation, I've been more active than usual on my other blog.  It's mainly about my sewing projects; if you're interested in seeing a couple of things I've made, head on over! I've also got a drawing or two up there, and I have decided to start sharing interior design ideas and other creative ventures on that blog as well, although I've only brought that up in the most recent post. I am going to try to be better at updating that blog more regularly, in an effort to help motivate me to spend some time on creative endeavours; I always forget sewing, drawing, and creating are what keep me sane! Although I have recently fallen into a sewing project and I've been putting the majority of my free time towards that rather than this blog, I promise I haven't forgotten you! I'm hitting my stride and finding a balance.

I've just got a quick post for you today, showing off Sephora by OPI's I Only Shop Vintage, a milky bronze with bright gold flakes and shimmer.  I was a little bit heartsick when I put this on and realized it was a nearly exact dupe for an Icing polish I'd picked up only a few weeks back... Oops! I guess that's the down side of being drawn to the same types of colors over and over again. I cannot find the Icing polish right now, but as soon as I can I'll let you guys know the shade name; I'll also throw a comparison pic up here as soon as I get around to taking one. However, I had the Icing shade on my toes when I put this on my nails, and from holding my fingers down to my toes, I literally could not tell the difference... The Icing shade is less expensive, although I really like the SOPI formula... But the Icing shades are regularly BOGO, so if you're planning on getting a couple (like maybe one of the several Deborah Lippmann glitter dupes!), you can get a really great deal. Actually, when I bought The Icing's version, I thought it would be very similar to China Glaze's Fast Track, which I love. They're cousins, but definitely not dupes; however, I Only Shop Vintage is the same type of shade, so if you like Fast Track, you'll probably like this one as well. 

The SOPI polishes are $9.50, and come with .5 ounces of product. Like I said above, this is one of my favorite nail polish formulas; they tend to be very slightly on the thicker side, but not so much that they get gloppy; just enough that they stay where you put them on the nail. They seem to do a little bit of self-leveling as well, which makes getting a nice smooth, perfectly applied look a cinch. Several of my absolute favorite nail polish shades are by SOPI! 

Ugh, I should have cleaned up my cuticles a little before taking these pictures, sorry... 

I Only Shop Vintage, indoor light


SOPI I Only Shop Vintage, direct sunlight
 If you click on this next one to enlarge it, you'll be able to see the small irregular flakes of bright gold foil in this polish. It's a really interesting texture, especially against the milky brown base!

SOPI I Only Shop Vintage, direct sunlight 

Summary: This is a gorgeous shade, but it's not undupeable. That being said, the formula is great, and wear time is a little better than usual. If you are not a fan of SOPI's formula or don't particularly care one way or the other, head down to The Icing and grab their dupe for less than half the price! I'll let you guys know the shade name when I find it! 

Thursday, April 5, 2012

New (to me!) Inglot Shadows

A little while ago I managed to pick up 4 more Inglot eyeshadows while at their new counter in the downtown San Francisco Macy's. Anyone been there lately? What is up with the new tropical theme in the cosmetics department? I feel like I'm in Vegas or something... I digress, there is now an Inglot counter, and I love the store for that. They were out of the 4-pan palette when I bought the shadows, which gave me some time to think about my future Inglot needs, and I went ahead and purchased a 10-pan freedom system palette. Eventually I think I'll transfer my older 4 shadows into it with my newer 4, but I left just the new ones in it for the photos so as to avoid confusion about which shade is being referred to.

If you've never used Inglot before, their shadows are to die for. I especially love their matte formula. They sell many of their shadows as part of what they call the Freedom System, where you buy pans on their own that fit into their line of palettes (or you can use a universal palette like a Z-palette, if you prefer). The shadows contain .09 ounces of product, and are $5 each; the price of the palettes varies based on size. You can check out all of their product offerings at their website for more information. I love that you can make your own palettes so easily, and that they have soooo many shades to choose from. I'm always so surprised how flattering the shades I picked out are, and then I remember it's because I was able to pick them all out myself from such a huge offering that I never had to compromise. I tend to pick out shades that I think will be good neutrals to travel with and do an everyday eye with, since those are the shades I use the most often, figuring I have plenty of crazy colors in my Urban Decay palettes and other sets like that. So, sorry I don't have any kickier colors to show you; rest assured, if that's your thing, they have beautiful brights!

The shades I picked up are :
Matte 352 (matte bright ballerina pink)
 Matte 390 (matte pale dusty rose/mauve)
 D.S. 461 (wheat-taupe with gold micro-glitter)
AMC eyeshadow 53 (purple-brown with rainbow micro-glitter)

Got that? I hate the finish/number designation rather than an actual name, just because it makes it so much harder to keep them straight. I think I may have confused two in my last post, since I had to lift up the pans to read the color... I think I may have scrambled the two matte shade names in the process. Oops. I should go back and investigate that sneaking suspicion...

I have such a hard time deciding between which pictures to show and which to leave. I'm going to err on the side of sharing too many pictures in this instance, since I know a lot of people have no way of getting to an Inglot counter on their own, and since it can be hellish trying to find swatches and reviews of their things online.


The palette

Shades in the pan, natural light Top Row L-R: 53, 461; Bottom Row L-R: 390,  352

This next one is purposefully fuzzy, since you don't need a sharp picture to see the color, but you DO need a fuzzy picture to see all that sparkle! Click for a closeup, especially of 53!
Indoor light. 
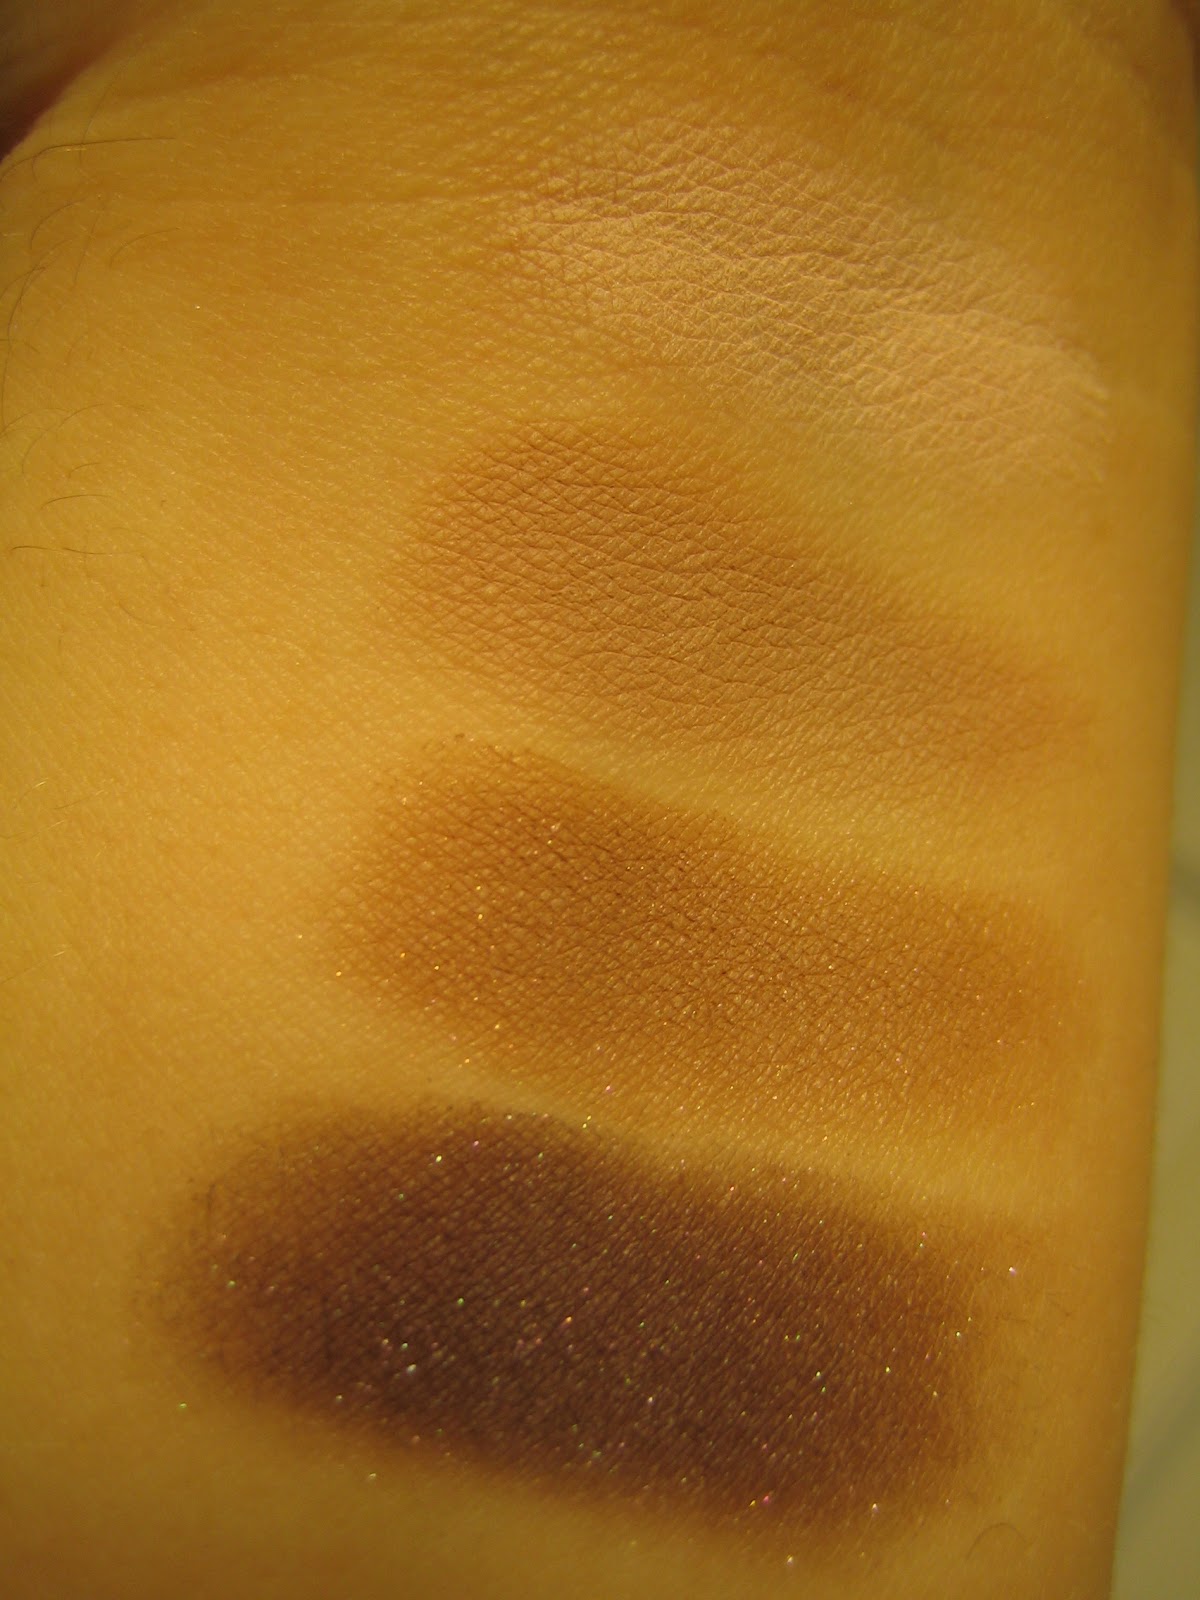
 In the following swatches, top to bottom we have 352, 390, 461, 53:

Indoor Light

Shaded natural light

On my monitor, the following swatches are the most accurate to what I see in the pan:

Direct natural light 

Aren't those amazing? I love that pale pink for a highlight; it doesn't have any grey or brown in it at all, so it just perks everything up. And I cannot get over how lovely the mauve matte is; it's such a subtle color, but it's very pretty. And those sparklies... I'm over the moon with this grouping, they're easy to wear.

Here is an eye look using these shadows. The only supplies I used on my eyes other than these four shadows were Urban Decay primer, Prestige brow pencil, Ulta brow gel, and Prestige My Biggest Lashes mascara. No eyeliner or other eye shadows.


Summary: Inglot makes high-quality shadows with a noteworthy matte formula, in an incredible range of colors. I love that you can buy shadows inexpensively and build your own palettes. My only complaints are that I wish there was somewhere on the back of the palette to write down which shadows are where, and that it was easier to get the pans out of the palettes to move them around; say a little lip in one corner or something you could grab more easily with tweezers or a fingernail. Their return policy isn't great, so ordering online isn't too attractive to me, but for those of you who live near a counter, definitely check them out! Especially now that they are branching out into some of the bigger Macy's stores, they are becoming more accessible. I know ordering online is the only option for lots of you, and while I get nervous if I can't poke at things in person, I would wholeheartedly recommend exploring their eyeshadows if you are curious! I've only had good experiences with the shadows (although I did have a lip pencil break on me! Grrr).

Wednesday, April 4, 2012

FOTD: Nautical Navy

Another Face of the Day! This one is a little bit of a departure from the coppers, taupes, and browns I've been wearing lately. I was inspired by my new Urban Decay blush in Bang and wanted to do a kind of retro-pinup look with a nautical inspiration. Here is the result!


I'm wearing one of my favorite necklaces, a string of jet beads that feels like it could be vintage (haha, it's not...), and a great sweater with a chiffon tie. It's so soft and feminine, and adds a bit of personality to otherwise boring outfits. I tried to take a picture of the bow, because I have a kind of abstract bow broach in black that I pinned on top of the real bow. Alas, the photographs of that didn't turn out :(

Here are the makeup products I used:


Face: Clinique Redness Solutions Daily Protective Base, Almay primer, Hard Candy Glamoflage Concealer (over all redness on face and under eyes), Physician's Formula Youthful Wear Foundation (used very sparingly to just blend the concealer I used into the rest of the skin), Urban Decay Cheek Tint in Bang, Fresh powder, The Body Shop Bronzer in 01 (around edges of face), NYX Blush in taupe (to contour cheeks), Tarte Blush in Exposed, Wet n Wild Color Icon Bronzer in Reserve Your Cabana (as highlighter).

Eyes: Make Up For Ever Aqua Cream in #13 as base, L'Oreal Infallible eyeshadow in Amber Rush (on lid), Urban Decay Ink for Eyes in Binge (on top lash line and outer 1/3 of lower lash line), NARS Outremer (on top of liner on top lid, in crease), Urban Decay eyeshadow in Baked (on roundest part of lid, to blend edges of Outremer), Urban Decay 24/7 pencil in Baked (between wings of blue eyeliner and pulled on top of lower lashline), Prestige My Biggest Lashes (top lashes), Stila Major Lash (outer top lashes, lower lashes), Prestige eyebrow pencil, Ulta eyebrow gel.

Lips: EOS lip balm, Urban Decay Cheek Tint in Bang, NYX Soft Matte Lip Cream in Amsterdam.

And some close-ups!


What do you guys think? I feel like it should be 80 degrees out and that I should be wearing this with a polka dot sundress and wedge sandals, maybe a flower tucked behind my ear? I love the bright blue of Outremer paired with a sheer tint of orange-red.

Urban Decay Afterglow Glide-On Cheek Tint in Bang

After reviewing Urban Decay's Afterglow Glide-On Cheek Tint in Quickie a little over a year ago, I finally got my hands on a second shade of this product. I was really impressed with this cream blush formula when I first tried it; I'm pretty surprised that it took me this long to pick up a second one! They're very lightweight and sheer; they kind of melt to the touch and don't feel heavy once they're on. They are not as pigmented as creamier, thicker cream blush formulas, like Illamasqua's or NARS'; rather, they give a very sheer, natural looking flush of color that looks very fresh and dewy. It's a really different feeling product from other cheek and face products I've encountered.

Bang is described as a bright orange on Urban Decay's website, and is one of their vegan shades. I think it definitely leans a little bit red, especially on my skin; I was going to call it an orange-red. These contain .14 ounces of product, and are $24. The compacts they come in are functional and very cute; they're sheer purple with a metallic snake design on top, and there's a mirror on the inside of the compact, making these a great product to travel with or throw into a purse.

Urban Decay Afterglow Glide-On Cheek Tint Compact


Urban Decay Cheek Tint in Bang, natural light

Bang in indoor light

I've built up a couple of layers of product in the swatches below; you could get it a little bit darker than this (but probably never opaque), and you can easily wear it more sheer than this.

Swatch of Bang, natural light

Swatch of Bang, indoor light

And here's a look where I used Bang as a base for my cheeks; note that there are other cheek products involved and layered on top! I've also got it on my lips mixed with some lip balm and a tiny dab of NYX's lip cream in Amsterdam.


Summary: I really enjoy the Urban Decay After Glow Glide-On Cheek Tint formula, and Bang is a gorgeous color. These bright oranges are really big for spring and summer, and this is a nice, easy way to wear it if you're just testing the water. I love orange reds, and I can see reaching for this blush often, since it's very difficult to find orange-red blushes that aren't mixed with a bit of brown or rose. When set with a bit of powder (or powder blush, as I usually wear cream blushes), I get about average wear time with these. As you see above, you can even use these on lips! However, they're not meant to be worn this way, so I'm not sure if I'm poisoning myself by putting this near my mouth, and I'd also recommend mixing these with a bit of balm if you'd like to use them this way.

A note on availability; I bought mine at a Sephora Inside JCP location, but this shade does not seem to be available in traditional Sephoras, or on their website. You can get it through Urban Decay's website, however, and I have only had good experiences ordering from them directly.

Review and tips: Ion Color Brilliance Liquid Hair Color

*BIG SCARY DISCLAIMER: I am not a professional. I have figured out how to dye my own hair, and I'm sharing that process with you. If you want to use ANY hair dye, even a relatively fool-proof drugstore at-home hair dye kit, please do some research. If you want to use the product I am reviewing, Ion Color Brilliance, or any other hair dye that requires you mix it yourself and is intended for professional use, do yourself a huge favor and make sure you do a ton of research. Don't JUST read this post; I fumbled my way through and got good results for myself, but I am in no way qualified to advise others on which products would work for their hair.*

This is a fairly long post; if you aren't new to coloring your hair, or just want to see the results, skip down to the photos and the summary for the "short version". 

I mentioned a couple of posts back that I (finally) dyed my hair again. I have been coloring my hair red since I was about 16, and I've wanted to be a redhead since I was about 12! In 8 years of dyeing my hair, I've used quite a few at-home brands with varying luck. I've gone burgundy-red and coppery-red and auburn brown. I've had my hair professionally dyed a few times as well, but decided it wasn't worth the money when I could do it myself at home and get a color that was as vibrant and just about as close to what I had in mind when I started.  Enter, Ion Color Brilliance. I'd grown discontented with drugstore offerings after they seemed to have eliminated the shade range between auburn brown and burgundy red; my go-to color is a bright coppery red, which is really difficult to find in a kit. I was also having to buy at least two kits to cover all of my thick, long hair, which wasn't cheap! The icing on the cake was when my favorite shade and formula combination was discontinued. I started reading about professional hair dyes and based on its reviews on the Sally Beauty website, settled on Ion Color Brilliance. People seemed really happy with the results.

Now, before you decide to run down to your local beauty supply store and buy hair dye, there are a few things you need to know. It's a big change in some ways from buying a box of hair dye from your drugstore; those are pretty fool-proof. There's a lot more that can go wrong when you are buying all the individual components on your own, and having to make more decisions without the proper training to do so. The hair dye you find at places like Sally Beauty, including Ion Color Brilliance, are meant for use by professionals. I knew that I was using these products at my own risk! That being said, I did a lot of research and read a lot about hair dye. First, you have to figure out the level of your original hair color, and the level of color you want to go to. Even though the red I was trying to go for looked to me like it was just as dark as my natural hair color, I realized after looking at swatches that I was really trying to lighten my hair quite a bit, and then add a red color on top of that in a single step. Based on your natural hair color (or your current dyed color) and the color you want, you decide what developer to use. In general, the lighter you want to go, the stronger solution you need to use. 

So, what did I use? I acquired: 

*a non-metallic mixing bowl. I needed to use a buttload of dye for all my hair, and the little mixing bowls they sell at Sally Beauty were not large enough. I bought a plastic bowl from Big Lots as my mixing bowl. 

*A Tint Brush: You can find these at beauty supply stores. They'll help you get the color from the bowl onto your hair. 

*Lotion. Any kind will do; you'll want to smear it around your hairline and on your ears, avoiding the hair itself, to help keep your skin from getting stained. 

*Gloves. I used regular latex gloves that we had laying around the house from painting. You can get a couple hundred to a box at Costco, or you can buy just one pair at beauty supply stores. 

*A wide toothed comb: to help pull the color through your hair. 

*a hair clip or two: to help keep your hair on top of your head while the color develops. 

*Hair color: I used Ion Color Brilliance Liquid hair color in 7IR (7 indicating the lightness/ darkness of the color, IR for Intense Red). It's described as a Medium Intense Red Blonde on the box. 

*30 Volume Creme Developer: This gets mixed in equal proportions to the dye. 

*Color Brilliance Pre-Color Treatment: Because my hair is long and has been dyed multiple times (and so it's more porous at the bottom than top), I decided to get this treatment to be on the safe side and aid in even color results. 

*Thick hair conditioner. It doesn't really matter which one you use, just make sure it's safe for color treated hair and very moisturizing. 

While this is more expensive the first time you do it than running to CVS and buying a box of dye, I got much better results with these products, and all but the dye itself will last you more than one use, so after your first application, you'll probably end up spending less using this system than a drugstore kit. And I can guarantee you'll end up spending WAY less than going to the salon! 

I mixed 2 bottles of color (for a total of 4 ounces) with 4 ounces of developer, stirred well, and applied it to my hair. I massaged it through, let it sit for 40 minutes, and then rinsed it out, following up by conditioning twice. My hair felt dryer than usual as I rinsed the color out, but after conditioning twice it is fine. 

Here are some pictures of my hair. My coppery auburn color had faded and I had a toooon of root showing. After coloring my hair, you cannot see a differentiation between hair that had been colored in the past and my virgin root color. This is impressive to me; lots of hair color kits in the past left a bit of a line. Also, this color is REALLY vibrant. It was hard for me to capture it on my camera. My skin looks a bit washed out in a few of these photos where the color my hair color is accurate. 

Before dyeing my hair:


After Ion Color Brilliance: 


And here are some of the products I used: 

The box of color and the Pre-Color Treatment 

On the side of the hair dye box; I don't know what any of this means! 

The bottle of dye itself


Scary warnings! 

The chart to help you figure out which developer to use
There are crazy warnings all over this thing telling you this is ONLY to be used by professionals. Therefore, if you (like me) are not a professional... Do this at your own risk! 

Summary: I've been really pleased with my results using this brand! This is actually the second time I have used Ion Color Brilliance; the first time I mixed this color with a less-vibrant copper red, and my results were great that time as well. I tend to start off brighter than I really want, knowing it will fade a ton after the first couple of washings. If you are dyeing your hair at home, you cannot be too picky about your results, but that being said, my results with this line have been pretty spot-on to the hair swatches they have in the store. However, I want to emphasize that these were just my experiences; hair dye can be really tricky. I also think that from years of using various dyes, I've learned how different shades tend to turn out on my hair. I know that I need to go lighter than I think I do; I know that I need to go more vibrant than I think I do. I cannot say if this would be the case for anyone else. But, if you've been thinking about making the switch from drugstore brands to professional hair color from a beauty supply store, I would recommend checking Ion Color Brilliance out! My results were consistent from root to tip, even on my long hair with damaged split ends. I haven't used this without the Pre-Color Treatment, so I can't say if that's why I got such even results, but I'd highly recommend using that product as well. It's certainly worth the few extra bucks, and one spray bottle will last you through a few applications at least. Also, the Ion brand developer is supposed to be gentle; I think this is probably the case, since when I've had my hair colored at salons, it's stung like crazy, but this wasn't painful at all. All in all, I've had a better-than-average experience with this line, and will continue to be loyal to it.